Everything you need to use imPRESS Studio efficiently — from your first imposition to full CLI automation.
What's new 1.4
New in versions 1.3–1.4
Cheat-sheet — every feature has its own detailed section below. The fastest path to a result is Work scenarios.
Two independent export ranges — a source page range (which PDF pages to impose) and an output sheet range (which finished sheets to write — for reprints). See Page & sheet ranges.
Conformant PDF/X-1a and PDF/X-4 with ICC — the app generates the OutputIntent (PDFX_def) and embeds the chosen profile, so the file passes print-shop validation. See PDF/X & ICC.
Cutting guide — an optional page at the end of the PDF with a sheet schematic and a numbered table of guillotine cut positions (in mm). See Cutting guide.
Barcode / QR on the sheet — Code 128 or QR carrying job metadata (job, sheet number, front/back) for scanning in the bindery. See Tracking code.
Saddle-stitch N-up — stacked copies (cut → fold) and a true 8-page signature 2×2 (double fold). See Saddle layouts.
Gatefold styles — 3-panel (6 pages) and 4-panel (8 pages) with configurable wing reduction so flaps don't buckle. See Gatefold.
Creep compensation fix — corrected direction and symmetric shift toward the spine (front and back). See Creep compensation.
Update integrity — installers fetched via Help → Check for updates are verified against the GitHub SHA-256 digest before launch.
Download
Where to download
The official distribution channel is GitHub Releases. Each release ships a Windows installer plus a changelog.
imPRESS Studio is a professional PDF imposition tool for print shops, prepress departments and DTP studios producing publications for offset, digital or print-on-demand workflows.
The app lays out document pages on press sheets (SRA3, A3, Letter or custom sizes) per chosen binding method, generates printer marks, compensates for creep and exports a final PDF — optionally in PDF/X-4 standard.
Key capabilities
Roll-fed step-and-repeat (1.2) — sticker and label production on a continuous roll with variable repeat, multi-segment splitting, basic auto-rotation nesting
Summa OPOS / OPOS-XY plotter markers (1.2) — print&cut workflow with four solid-black markers at the cut group corners
Logo overlay (1.2) — stamps PNG/JPG/PDF on every output sheet (once per sheet or once per item, 9 anchor positions)
Interactive sheet preview with thumbnails, navigation and rotation
Printer marks: crop, registration, CMYK color bars, fold marks
Automatic creep compensation for saddle stitch
Overprint simulation (multiply blend)
Job statistics and cost estimation
PDF/X-4 conversion with ICC profile (via Ghostscript)
Batch CLI mode for automation
Quick start
Five steps to your first imposition
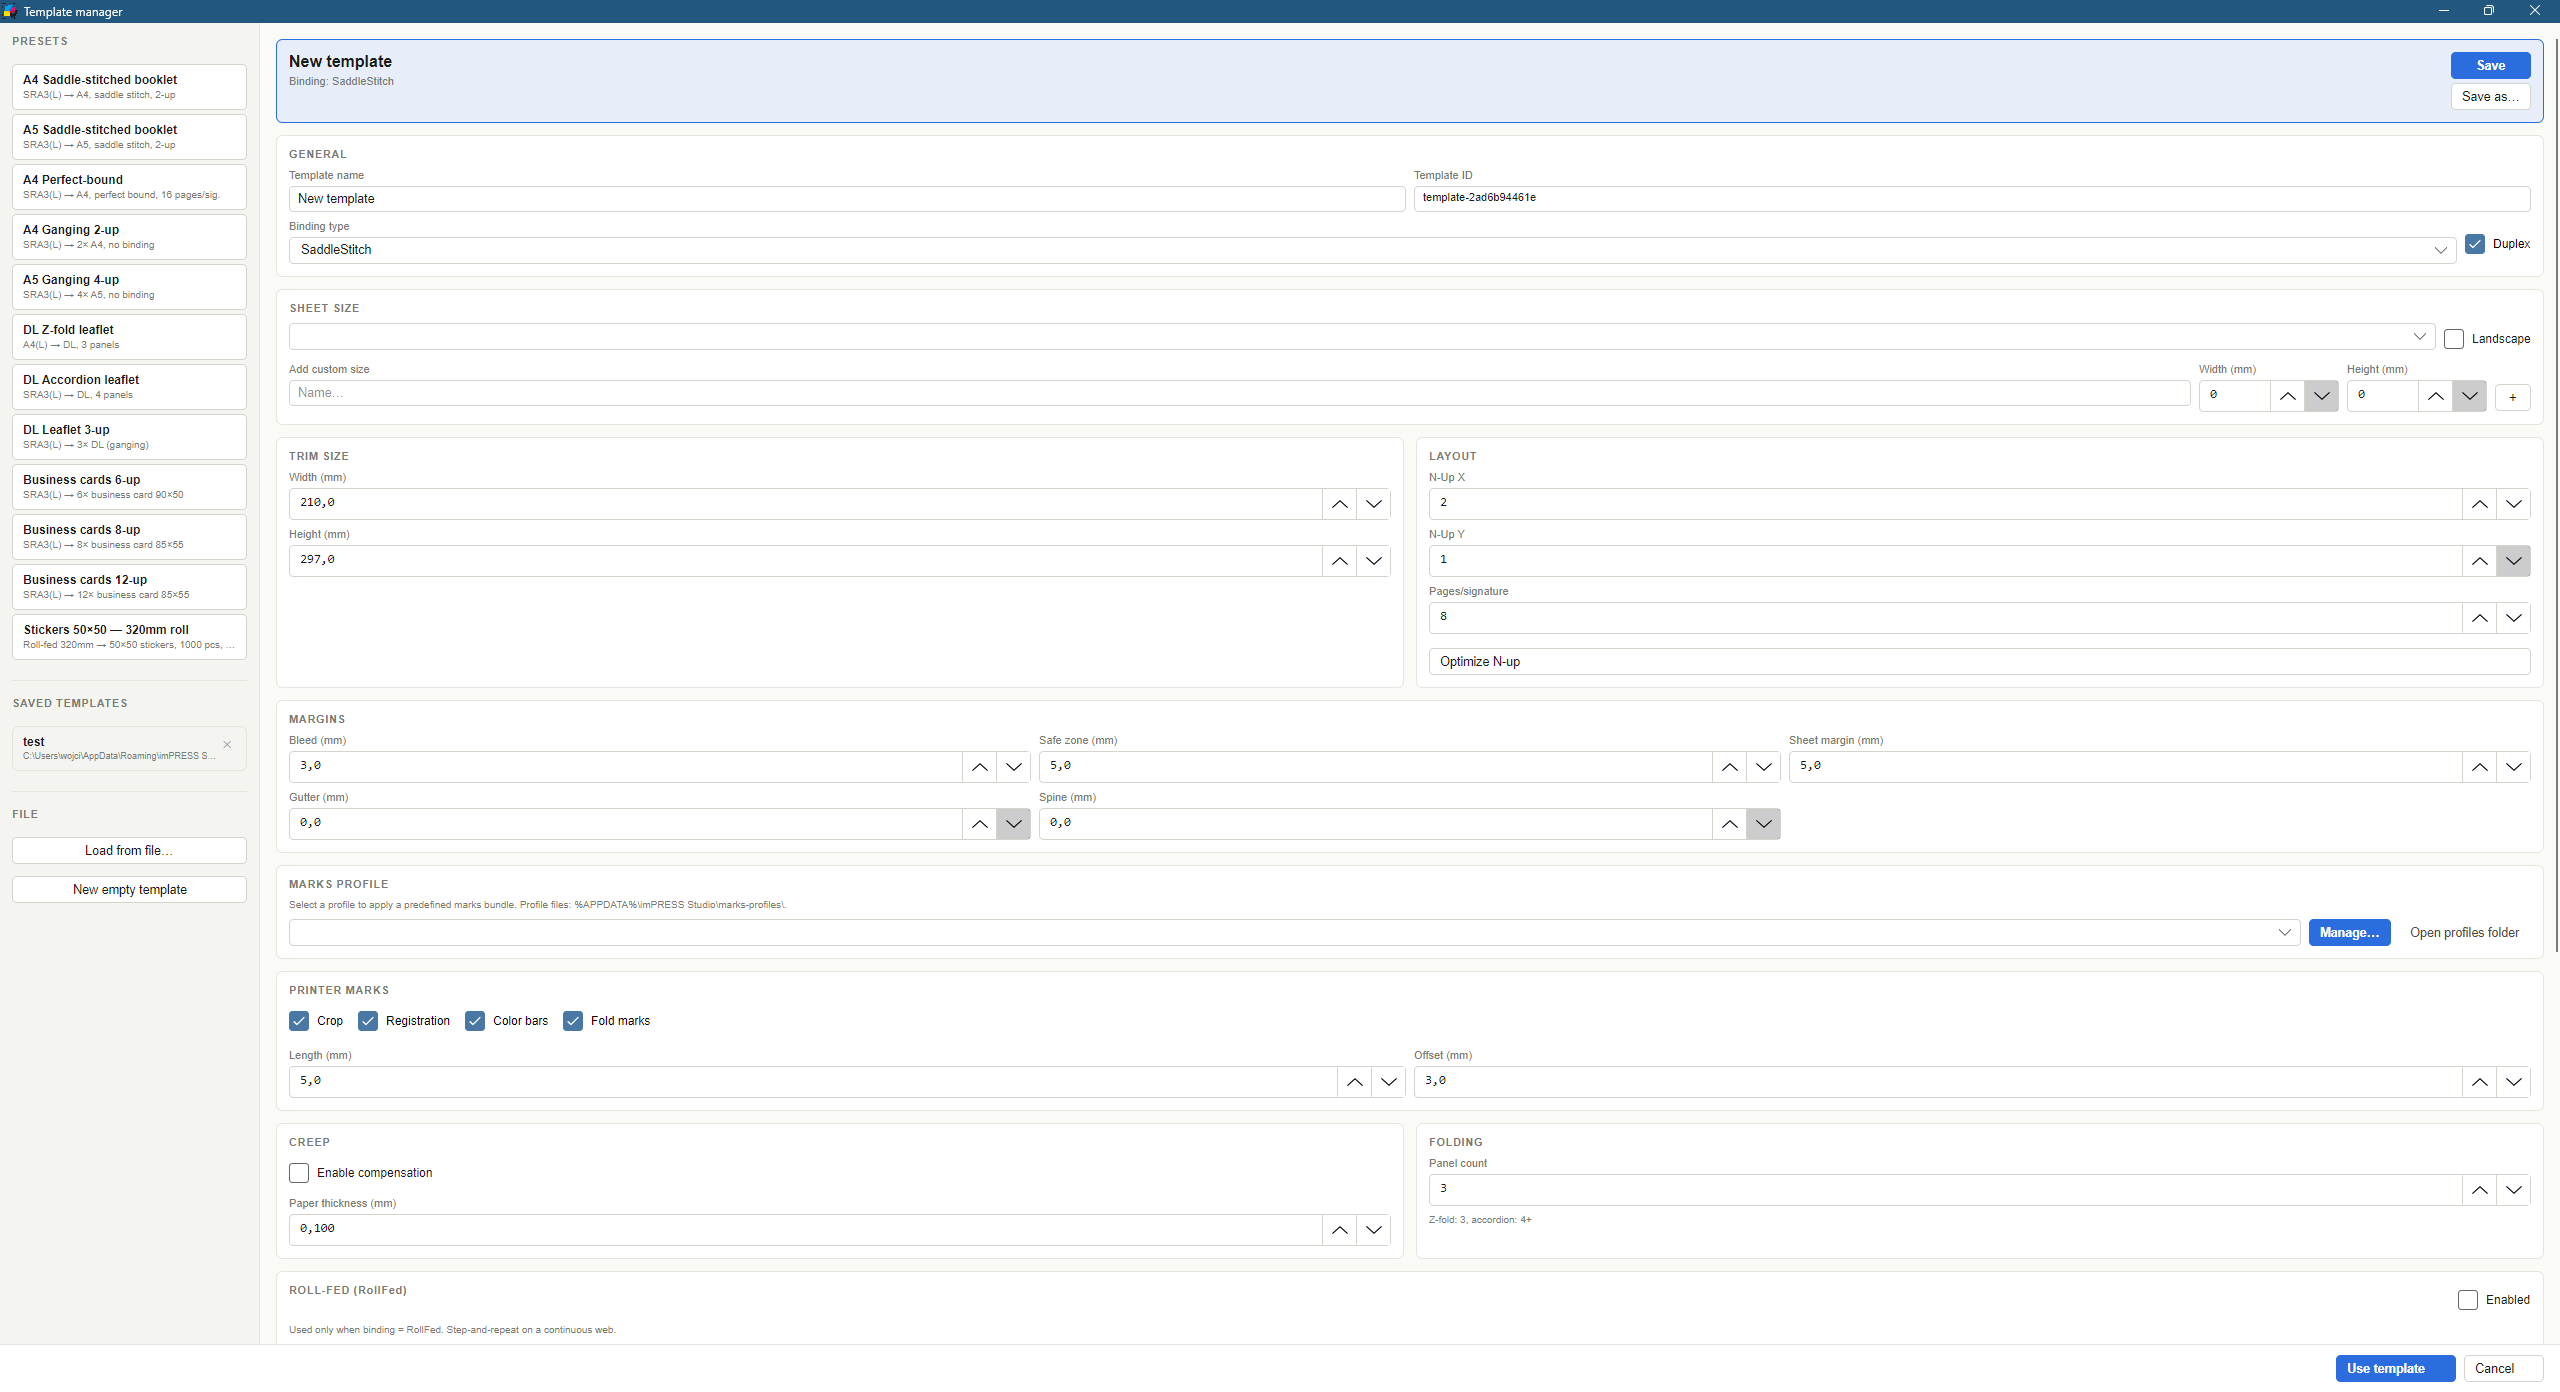
Pick or create a template — click Template in the top bar or Manage templates in the left panel. Choose a preset (e.g. "A5 booklet — saddle stitch") or define your own.
Load a PDF — click + Add files… or drag & drop a PDF onto the window. If you add multiple files, check them and click Load selected to merge.
Plan imposition — press Ctrl+P or Plan. The app lays out pages per template.
Review preview — browse sheets with ← →, zoom with mouse wheel, toggle marks, swap front/back or spread view.
Export — press Ctrl+E. Pick sheet range, PDF standard and (optionally) PDF/X-4 conversion. Choose output path and you're done.
Tip: for your first run, try a short PDF (e.g. 16 pages) with a simple "A5 — saddle, 2×1" template. It makes the page-arrangement logic click immediately.
Work scenarios
Ready-made recipes — from file to print
Six common jobs, step by step. Each scenario tells you which settings to pick and which section to read for detail.
1 A5 booklet, saddle stitch, 16 pages
Goal: a folded A5 booklet stapled at the spine, printed 2-up on A4/A3.
SaddleStitchTwoUpCreepDuplex
Template: saddle stitch, A4/A3 sheet, A5 trim, 16 pages per signature, TwoUp layout. See Saddle layouts.
On heavier stock, enable creep compensation and set the paper thickness.
Load the 16-page PDF → Ctrl+P (Plan). Check page order and front/back in the preview.
Ctrl+E → optional PDF/X, pick the output file. Done.
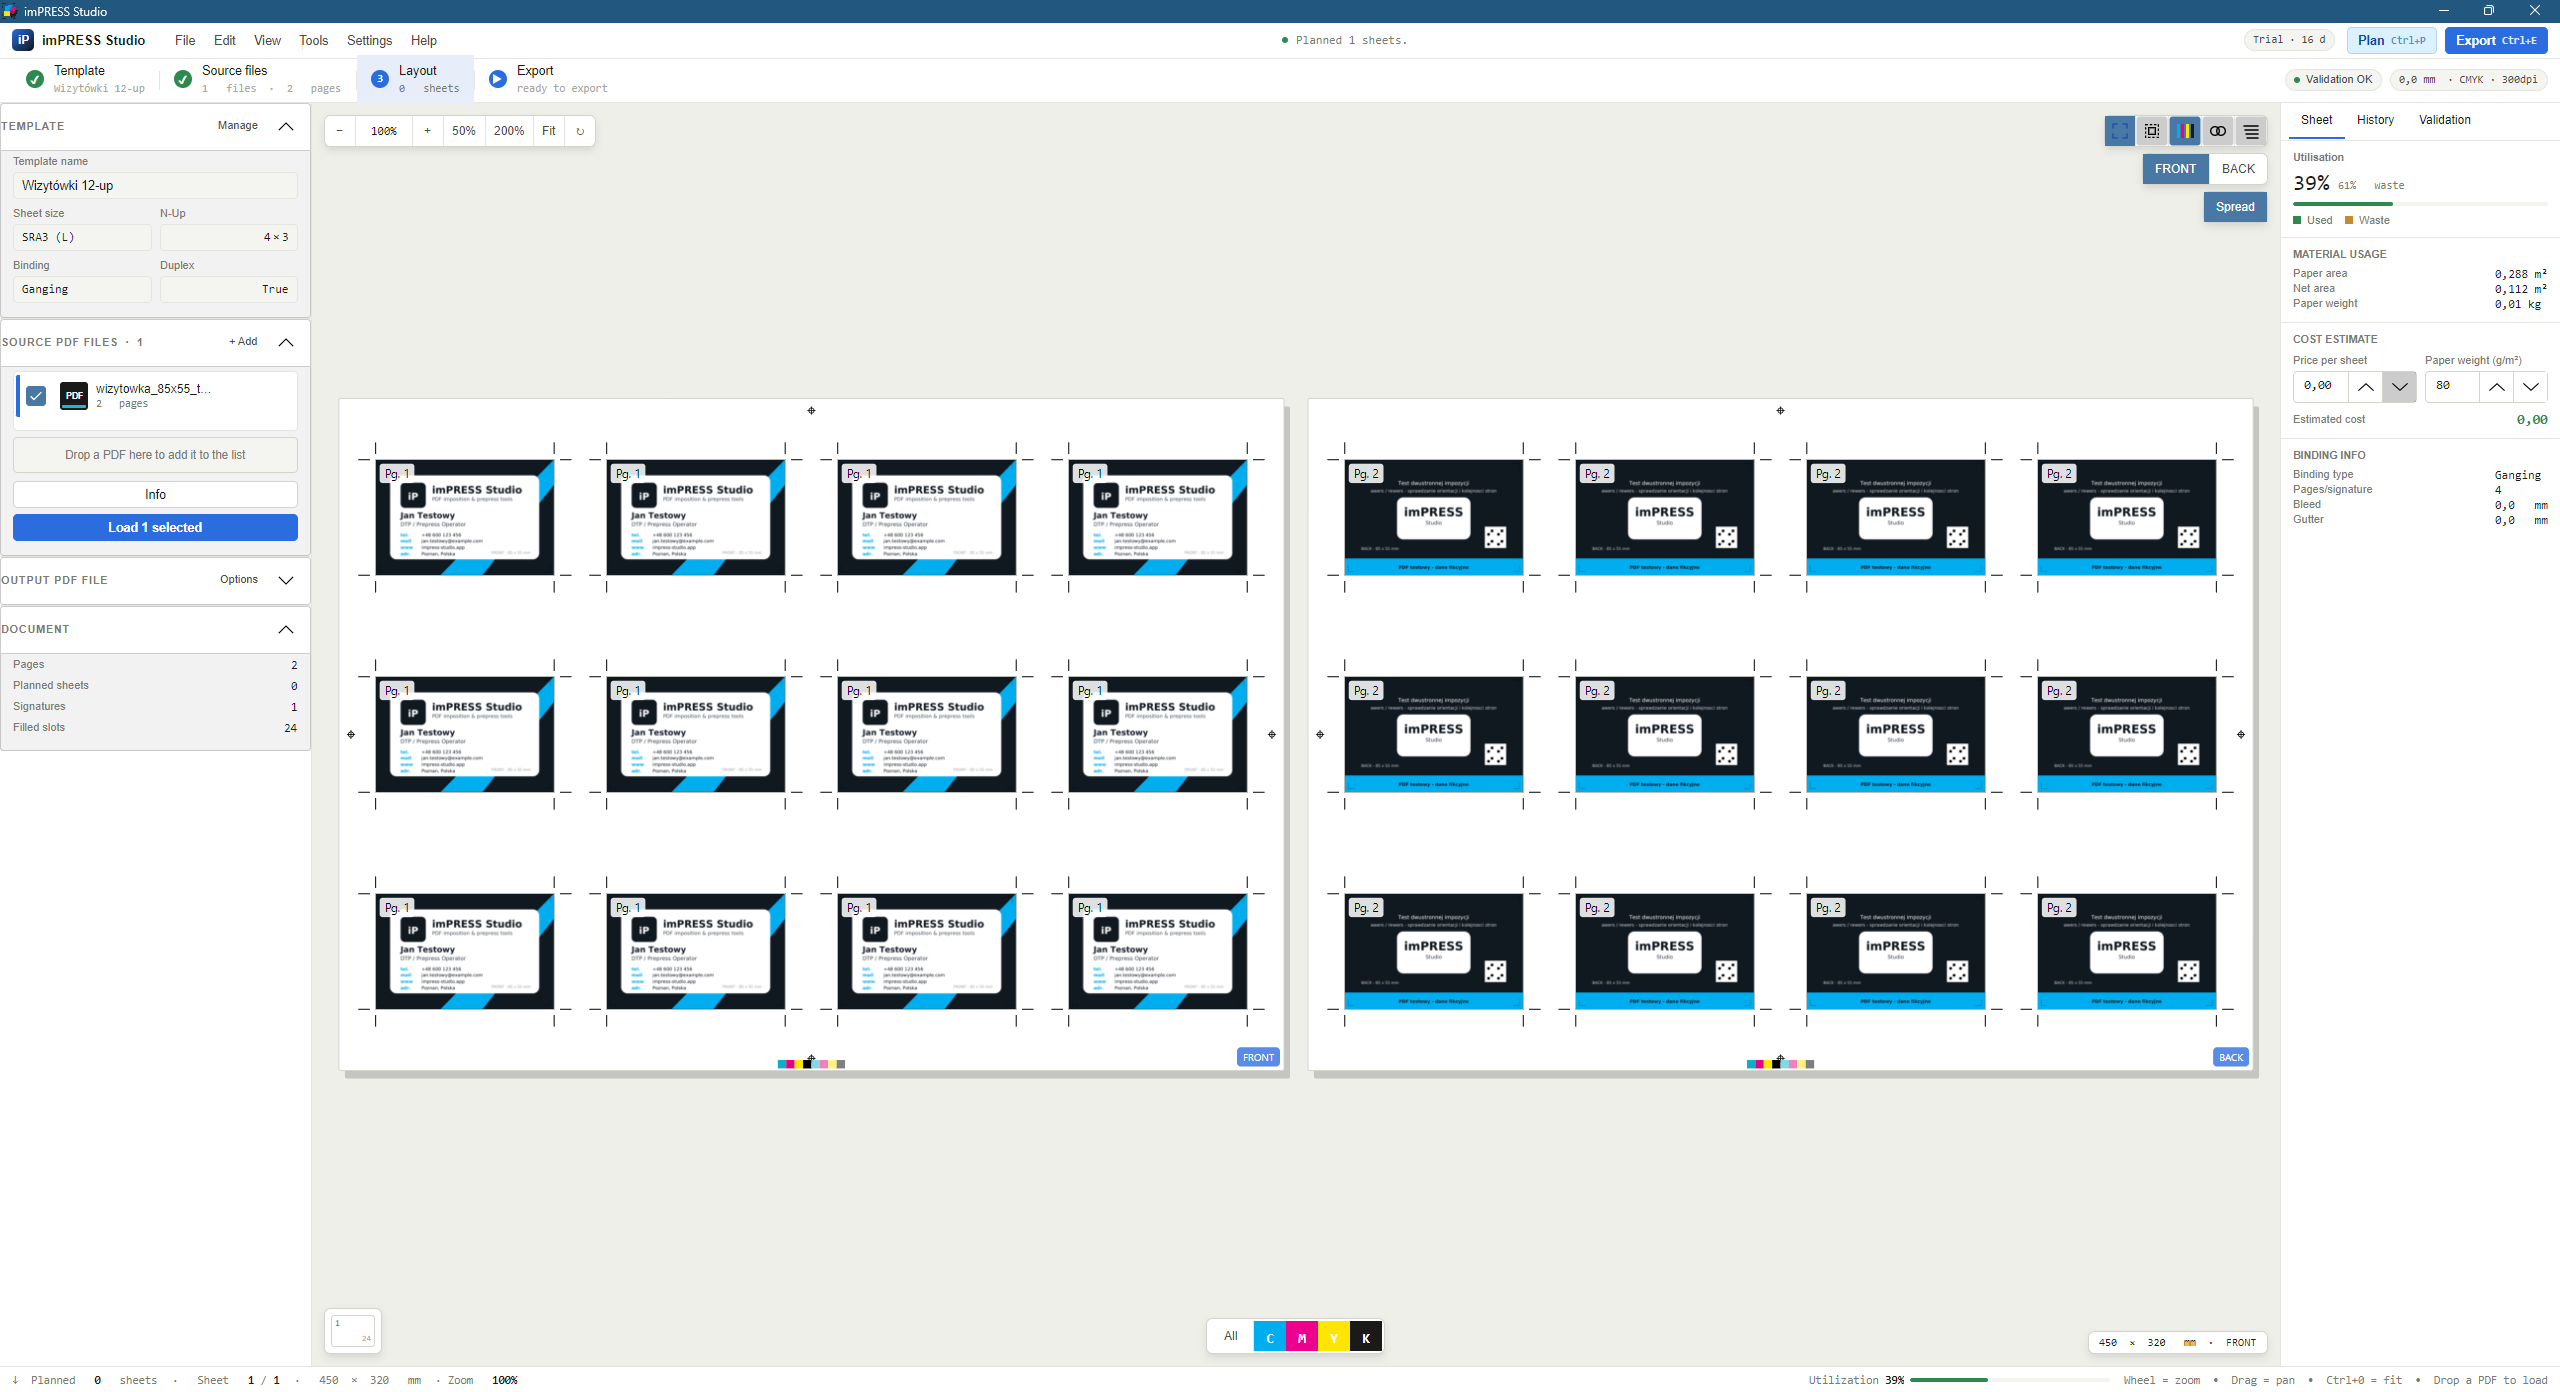
2 Double-sided business cards, 4×4 per sheet
Goal: 16 cards per sheet, front and back, with a guillotine cutting guide.
GangingDuplexCutting guide
Template: Ganging, 90×50 mm trim (+bleed), 4×4 N-up, gutter to suit the knife, Duplex on.
Source: a 2-page PDF (page 1 = front, page 2 = back).
Printer marks — crop, registration, color bars, fold marks
Creep compensation — for saddle stitch
Folding options — number of panels (Z-fold: 3, accordion: 4+)
New in 1.2.3
Template suggestion from PDF
When a client hands you a PDF and you don't know which template fits — let the app propose. The Template Suggestion Engine analyses page size, page count, proportions and common print formats, and returns the best-fitting presets ranked by confidence (0–100%).
How to use
Load the PDF (left panel, + Add files…).
Menu Tools → Suggest template from PDF…
A dialog opens with 1–5 suggestions sorted by confidence (descending).
Click a card — the template is loaded into the app, you can press Plan immediately.
Bleed presence (BleedBox > TrimBox) — presets with matching bleed are preferred.
DriverColor / spot channels — sticker presets with white/varnish overlay get a boost.
Tip: if confidence is below 60%, the engine shows a warning and suggests manual refinement. Best results come from files with valid TrimBox and a standard trim size.
New in 1.2.3
N-up layout optimizer
When laying out rectangular items (cards, stickers, labels) on a larger sheet, manually trying every N-up + orientation combo is tedious. The Layout Optimizer does it for you: for a given item size, sheet size and margins, it tries both portrait and landscape and picks whichever fits more pieces per sheet.
How to use
Open the Template editor (button Template in the header).
Edit an existing template or create a new one.
Set: sheet size, item trim size, bleed, sheet margins, gutter.
Click Optimize N-up — columns / rows / orientation auto-fill with the highest-density packing values.
Tip: Optimizer doesn't handle per-item rotations (mixed-rotation nesting). For that, use roll-fed nesting in the Roll section — the engine there can rotate individual items by 90°.
Source files
Working with PDFs
The left panel Source PDF files tab lets you manage input documents:
+ Add files… (Ctrl+O) — opens a standard file picker. Multi-select supported.
Drag & drop — drop PDFs anywhere on the window.
Checkboxes — pick which files to load. Multiple checked → merged in list order.
▲▼ arrows — reorder files before merge.
Info — details for selected PDF: page count, sizes, trim, metadata, fonts, transparency, encryption, tagging, OCG layers.
✕ — remove file.
Tip: the Info panel is invaluable for diagnostics — it surfaces encryption, mixed page sizes, missing bleeds and unembedded fonts.
Preview
Sheet navigation
Mouse wheel — cursor-anchored zoom
Click & drag — pan
← / → — previous / next sheet
Bottom thumbnails — jump to any sheet
Ctrl+0 or F — fit to window
R — rotate view 90°
Ctrl + + / Ctrl + - — keyboard zoom
Quick zoom buttons: 50%, Fit, 200%
Preview options
What you can visualize
Front / Back — toggle sheet sides. 1.2.3: the toggle now also works in spread view — it auto-exits the spread, shows the picked side and stays.
Spread — front and back side-by-side for register check. Disabled by design for roll-fed binding (a roll is not a booklet).
Printer marks — crop, registration, CMYK bars, fold marks. 1.2.3: CMYK bars are now placed at the top-center inside the paper (not outside) so they stay visible in the preview.
Trim/Bleed guides ★ (new in 1.2.3) — independent toolbar toggle. Around every placement it draws:
━━━ cyan dashed → TrimBox (post-cut line)
··· magenta dotted → BleedBox (bleed extent)
Off by default to keep the view clean — turn on when you want to verify bleed and trim alignment.
Creep — orange dashed lines showing compensation per signature
Overprint — multiply-blend simulation for ink darkening
View rotation — 90° rotate to verify press orientation
Overview mode — below 25% zoom (threshold lowered from 50% in 1.2.3) the canvas draws page-number placeholders instead of rendering bitmaps — lets you scroll a 1000+ slot roll-up instantly.
Binding
Joining methods
Saddle stitch
Folded sheets stapled at the spine. Typically 8 or 16 pages per signature. Ideal for short publications (up to ~60 pages). Requires creep compensation at higher page counts.
Perfect bound
Each signature is glued separately at the spine. For thicker books (50+ pages). Requires spine width driven by total book thickness.
Folding
Sheet folded without cutting. Used in flyers, brochures, maps:
Z-fold — 3 panels in Z shape
Accordion — 4+ panels alternating
Fix in 1.2.3
Duplex pairing in roll-fed / N-up
In 1.2.0–1.2.2, laying out a 2-page PDF with 12-up + duplex produced two separate single-sided sheets. In 1.2.3 the GangingStrategy does what production expects: 1 sheet with 12 fronts on the front side and 12 backs on the back side.
What exactly changed
For each N-up, the engine pairs pages in sequence (1+2, 3+4, 5+6, …). Odd page goes to front, even page to the back of the same slot.
If page count is odd, the last page gets a blank back — no extra empty sheet is generated.
Works for both classic N-up (cards, labels) and roll-fed step-and-repeat with duplex.
The stats panel correctly reports 1 physical sheet with 24 impressions (12+12), not 2 sheets.
When you DON'T want pairing
If every page is supposed to be on a separate sheet (e.g. a series of different business-card designs printed separately), use step-and-repeat per page in the Roll-fed section, not duplex.
Test coverage: protected by a regression unit test GangingStrategy_DuplexPairs2PagePdf_Into1Sheet in the 109/109 test suite shipping with 1.2.3.
Concepts
Margins and marks
Bleed
Artwork extending beyond trim — typically 3 mm. Prevents white edges from imprecise cutting.
Safe zone
Minimum distance for text and key elements from trim — typically 5 mm.
Gutter
Space between adjacent pages on a sheet. Allows clean cutting after print.
Sheet margin
Distance from sheet edge to first page. Required by press grippers.
Spine
Spine width for perfect-bound. Calculated from paper thickness × page count.
Crop marks
Thin lines at corners marking the cut location.
Registration marks
Crosshairs used to align CMYK separations.
Color bars
CMYK control bars to measure ink density on press.
Fold marks
Dotted lines indicating folding location.
Creep
Creep compensation
In saddle stitching, all signatures nest into each other. Inner pages "stick out" beyond the outer pages by the thickness of preceding sheets. After trimming the outer edge, inner-page margins become narrower — by several millimeters in thicker pubs.
Creep compensation shifts inner-page content toward the spine so that, after trimming, all pages have identical margins. The outermost sheet is the reference (no shift); each sheet further into the section moves by one paper thickness. The shift applies to both leaves of a sheet — on the front and the back alike.
How to enable
Open the template manager
In the Creep tab check Enable compensation
Enter paper thickness — typically 0.1 mm for 80 g/m², 0.13 mm for 115 g/m²
Toggle Creep in the preview to see the compensation lines
Note: creep compensation only applies to saddle stitch. With perfect-bound, each signature is independent and the issue does not arise.
The classic preflight in 1.0–1.2.2 returned a flat list of 30+ issues with no prioritisation — easy to miss the one thing actually blocking print. Preflight v2 in 1.2.3 ships a colored summary panel above the list plus content-based bleed detection: the app inspects where content actually ends, not just the declared PDF boxes.
Smart Preflight Summary panel
Above the issue list, a colored panel adopts one of four moods:
✓ Passing (green) — no issues. Ready to print.
i InfoOnly (cyan) — informational notes only. Can ship, worth reading.
⚠ WarningsOnly (amber) — warnings, no blockers. Print will go through, quality may differ from expectations.
✕ Critical (red) — errors that may stop the RIP or produce wrong output. Fix before export.
Below the mood, you get Top-5 prioritized actions in imperative form (e.g. "Add 3 mm bleed to source file", "Embed font OpenSans-Bold", "Convert RGB JPEG to CMYK"). Clicking an action jumps to the matching issue on the list.
Content-based bleed detection
A new PdfContentExtentWalker walks renderable objects (images + text glyphs), computes real extent and compares it to the declared TrimBox / BleedBox. Two new issue codes:
BLEED_CONTENT_UNUSED — BleedBox is larger than TrimBox, but content stops at the trim. No actual bleed — print shop will reject. Action: extend artwork 3 mm beyond the cut line.
BLEED_CONTENT_OVERFLOWS_BLEEDBOX — content extends past BleedBox. RIP may clip — either BleedBox is wrong, or the element needs to be shrunk. Action: fix BleedBox or move the object.
Running preflight manually
Load the PDF.
Menu Tools → Preflight (or the Preflight button in the left panel).
A window opens with the summary panel (top) and issue list grouped by severity.
Click actions in the panel or issues in the list — some come with an in-place Fix button.
Preflight during export
In the export dialog, tick Strict preflight — export will halt if there is even one Critical issue. Without strict mode, export continues but issues are written to the log.
For developers / QA: 1.2.3 ships 43 new unit tests (109/109 total), including full coverage of the content-bleed walker and the summary generator.
Export
Export step by step
After hitting Export (Ctrl+E) the app runs the full pipeline:
Converting to print standard (PDF/X-1a and PDF/X-4)
PDF/X-4 (ISO 15930-7) supports transparency, layers and ICC profiles — the recommended default. PDF/X-1a (CMYK, no transparency, PDF 1.4) is sometimes required by older offset workflows. Both are chosen in the Export options dialog.
Requirements
Ghostscript — auto-detected (Program Files / PATH), or specify the path manually in the export dialog.
ICC profile — .icc/.icm file. Profiles are bundled; import your own with Import profile… (stored under %APPDATA%\imPRESS Studio\icc).
Conformant OutputIntent
The app generates a PDFX_def control file carrying an OutputIntent and embeds the chosen ICC profile as the DestOutputProfile. That makes the output conformant PDF/X that passes print-shop validation (plain -dPDFX with no OutputIntent produced files that were rejected). If you don't pick a profile, a standard printing-condition identifier (CGATS TR 001) is used — but always prefer a real profile.
Common profiles
PSOcoated_v3.icc / ISOcoated_v2_eci.icc — offset, coated paper
PSOuncoated_v3_FOGRA52.icc — offset, uncoated paper
eciRGB_v2.icc — RGB working space
File name: the PDF/X result is written next to the output with a suffix — e.g. job.pdf → job.pdfx4.pdf (or .pdfx1a.pdf). The post-export message shows the exact name.
Ranges
Source page range and output sheet range
The Export options dialog has two independent range fields — they do different things and are easy to confuse (hover the ⓘ icon next to each for a tooltip):
Source page range
Picks which pages of the source PDF get imposed — before layout. Format: 1-2, 1,3,5-8. Most useful for N-up / ganging / wiro (e.g. "impose only pages 1–4 of a 40-page file").
Booklet note: for saddle/perfect bound, the selected pages are still padded with blanks up to a full signature — use the output sheet range there instead.
Output sheet range
Picks which finished sheets are written — after imposition. Sheet numbers match the preview. Typical use: reprinting a single damaged sheet without exporting the whole run. Sheet numbers in the marks stay original (a reprint of sheet 7 is still "7").
Cutting guide
Guillotine cutting guide
Tick Append cutting guide in the export dialog to add an extra A4 page at the end of the PDF with a sheet schematic and a cut-position table in millimetres.
Vertical cuts measured from the left sheet edge (V1, V2…), horizontal from the top (H1, H2…) — the way a guillotine is dialled in.
Sheets with an identical layout share one guide; a job with differing layouts (e.g. a shorter final roll segment) gets one page per layout.
Shared edges (zero gutter) collapse into one cut; edges on the sheet boundary are dropped.
Note: for folded bindings (saddle, folding) the centre line is a fold, not a cut — the guide is best suited to cut work (ganging, step&repeat, wiro, labels).
Tracking code
Barcode / QR on the sheet
In the marks profile (marks profile editor) enable the Tracking code section to print a job-identifying code on each sheet corner — for scanning at the cutter, folder or stitcher.
Type: QR (2D) or Code 128 (1D, with optional human-readable text under the bars).
Content: the same placeholders as the slug — {jobid}, {sheet}, {sheets}, {side} (front/back), {filename}, {date}. Default {jobid}|{sheet}/{sheets}|{side}.
Position: corner choice + edge offset; quiet zones are standards-compliant.
The code is drawn as vectors (crisp at any resolution) and is also visible in the sheet preview.
Saddle N-up
Saddle-stitch sheet layouts
In the template editor, under Saddle stitch — sheet layout, pick one of three layouts:
TwoUp — classic 2-up: one spread per sheet (e.g. an A5 booklet on A4/A3).
StackedCopies — N identical copies of the spread in rows on a larger sheet. The sheet is cut into strips and each strip folded separately — N identical booklets per press pass (typical digital). Set Copies per sheet.
EightPageSignature — a true 8-page 2×2 form: the top row rotated 180° (heads together), the sheet folded twice on a right-angle folder with no cutting. Requires pages-per-signature divisible by 8; for 16 pages the sheets nest correctly (outer 1–4 + 13–16, inner 5–12).
Gatefold
Gatefold — panel styles and fold reduction
For the Gatefold binding, under Gatefold — panel layout, choose a style:
ThreePanel (6 pages) — a centre panel plus two wings folding inward.
FourPanel (8 pages) — two "doors" folding over a two-panel centre spread, meeting at the centre.
Fold reduction (mm) narrows the wings/doors at their meeting edge so they don't collide or buckle at the spine when folded. Typically 1–3 mm; 0 disables it.
Statistics
Job statistics panel
After planning, the right panel shows detailed job stats:
Sheet and signature counts
Filled / empty slots per sheet
Paper area — gross and net (post-trim) in m²
Estimated weight — based on grammage
Paper utilization — % ending up in the final publication
Waste — % trimmed off
Estimated cost — derived from per-sheet price
Binding info — type, signature, bleed, gutter
Custom sizes
Adding a custom paper size
Open the template manager
In the Sheet size section choose Custom or click Add size
Enter name (e.g. "Banner 520×720"), width and height in mm
Click Add — the size joins the predefined list
Note: built-in sizes (A4, A3, SRA3, B2, Letter, Legal) cannot be overridden. Custom sizes live in the current session — save them in a template to persist.
CLI
Command-line mode — automation
Run imPRESS Studio from the command line for batch jobs (hot folder, scripts, MIS/ERP integration):
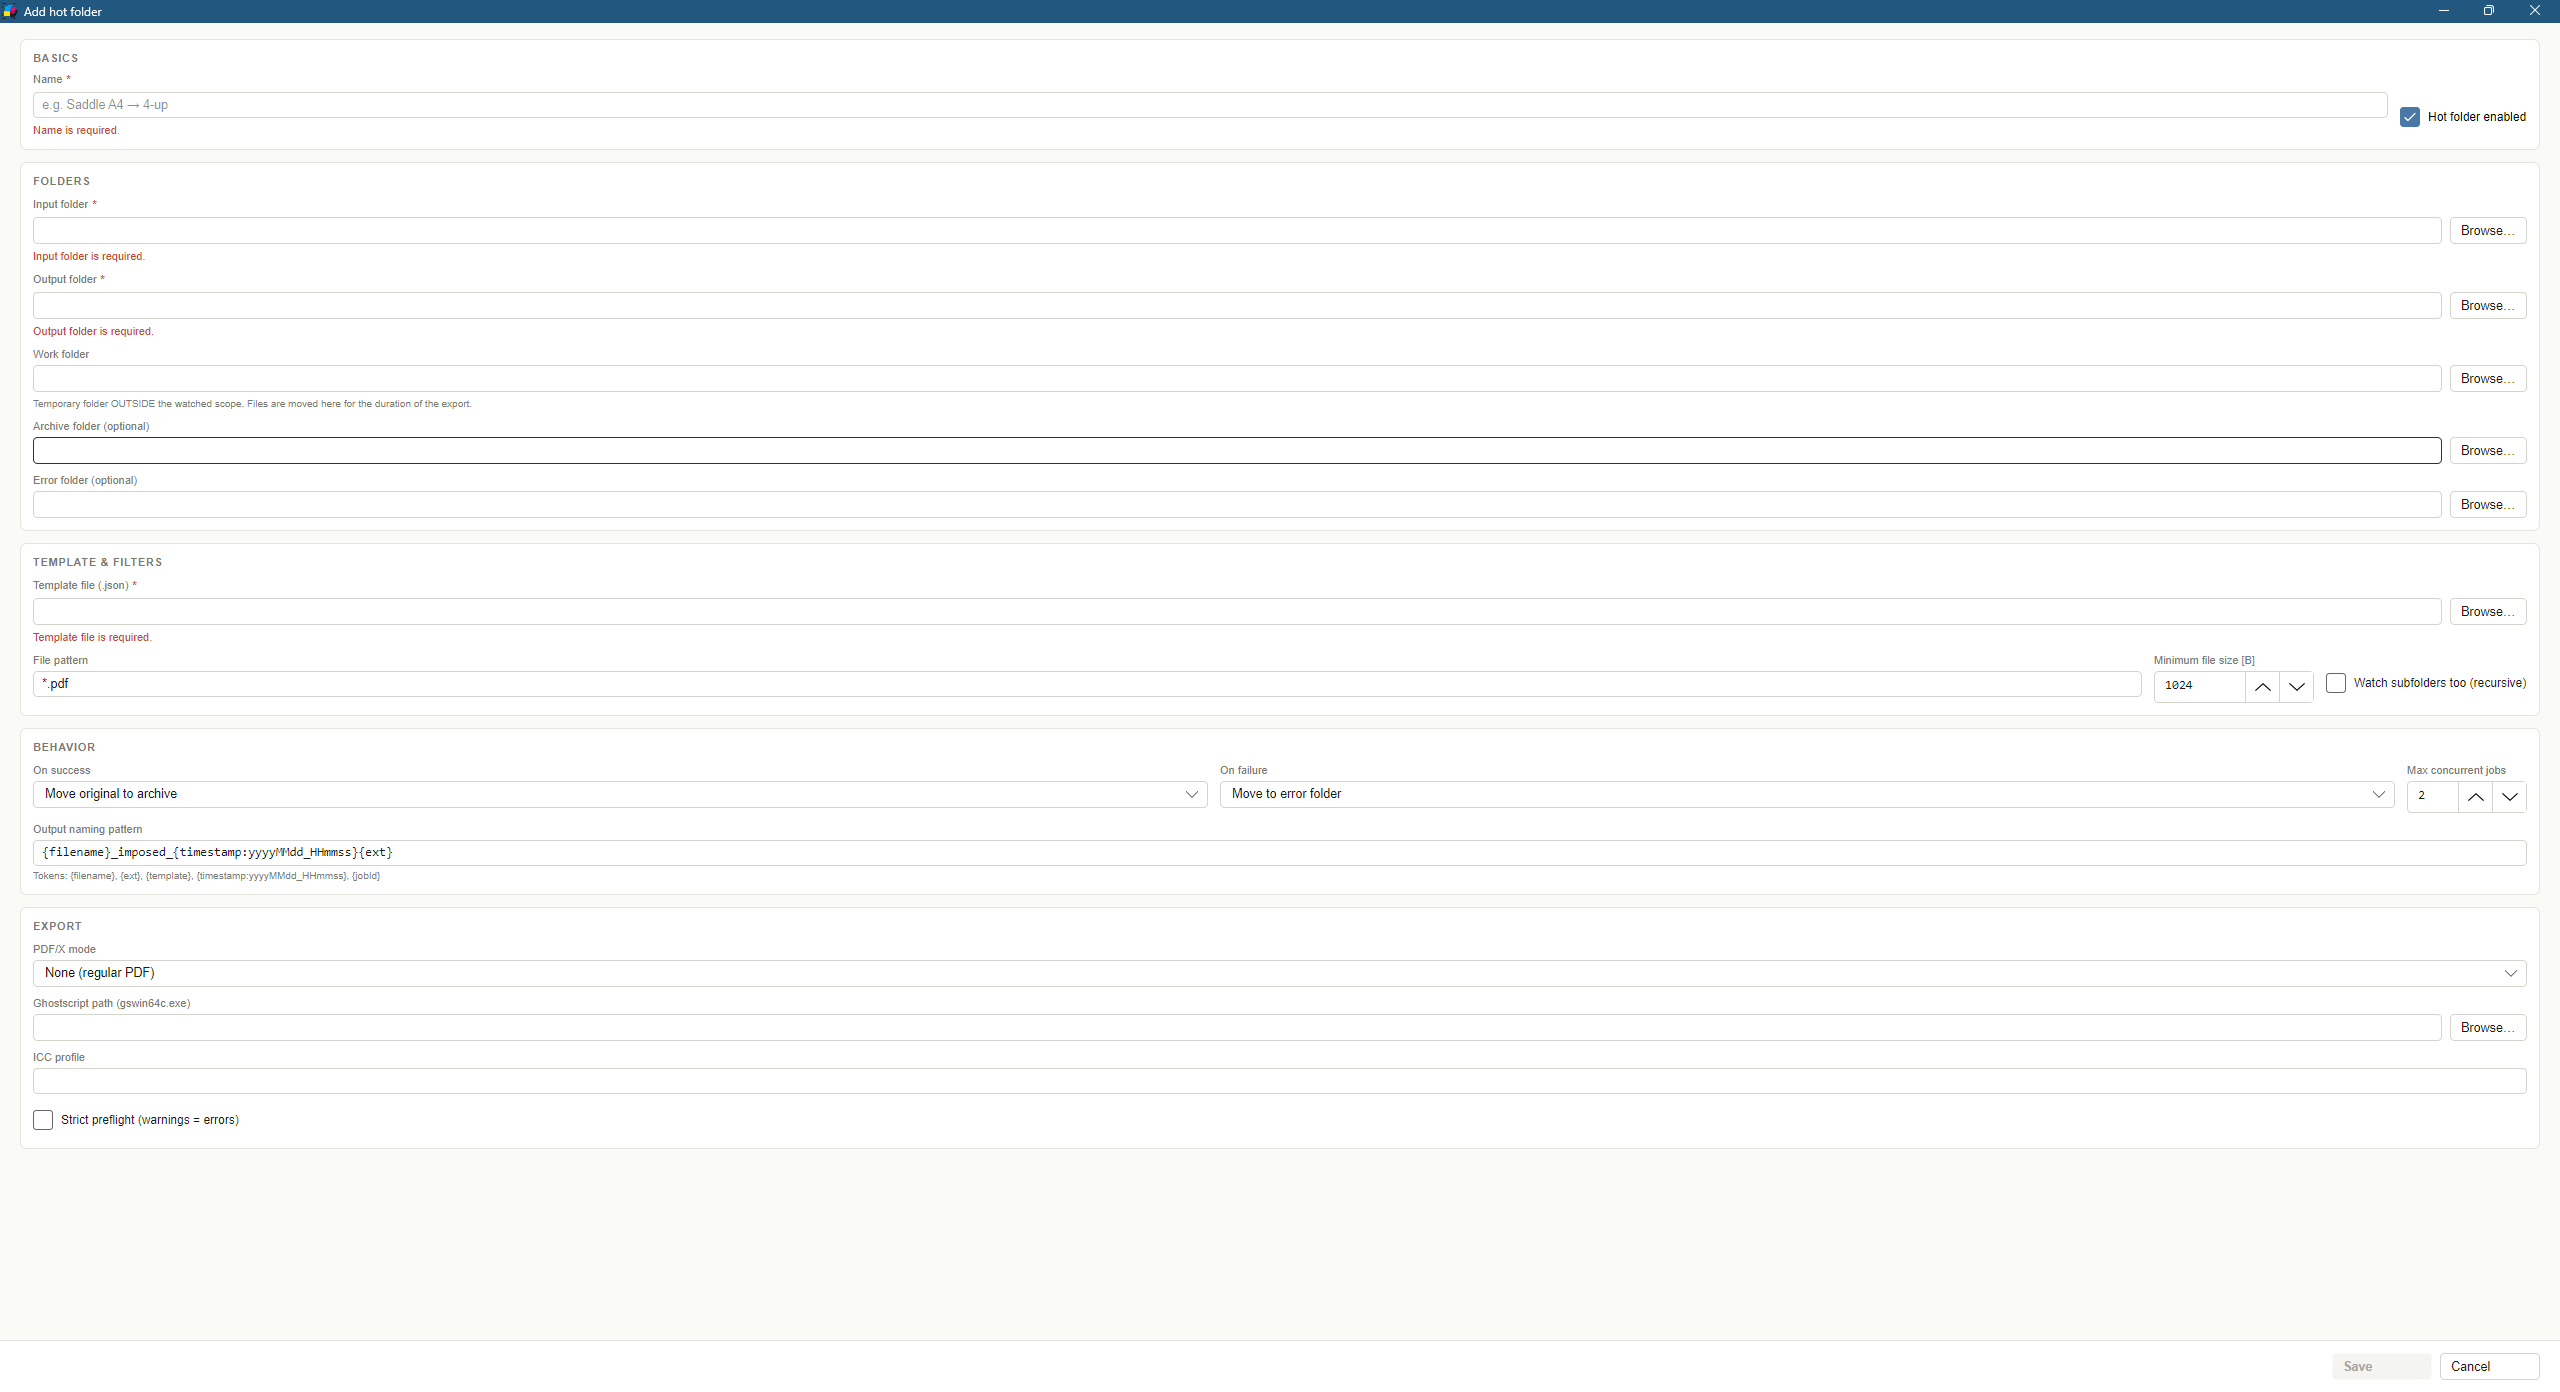
Hot folders — automatic imposition for production workflows
A hot folder is a watched directory: the application detects every PDF dropped into it, applies the chosen template, and writes the imposed sheet to the output folder. Built for "operator drops a PDF, ripper picks up the imposed sheet" workflows. Introduced in version 1.1.
Hot folder manager — each row is a watched directory with its own template, status and counters (done / failed / skipped).
Opening the hot folder manager
Menu Tools → Hot Folders…. By design there is no extra button on the main toolbar — this is a production feature, accessed from the tools menu.
Adding a hot folder — step by step
In the manager window click Add
Enter a Name (e.g. "Saddle A4 → 4-up") and check that Hot folder enabled is on
Pick the Input folder (where the operator/DTP drops PDFs) — the Browse… button opens the system folder picker
Pick the Output folder (where the app writes imposed sheets)
Work / Archive / Error folders can be left blank — they will be auto-created as .work, .archive, .error inside the input folder. Below each blank field you see exactly which path will be created
Pick the Template file (.json) — the imposition template applied to every dropped PDF
On success: Move original to archive (default), Delete original, or Do nothing
On failure: Move to error folder (default) or Leave in work folder
Optionally set PDF/X mode + Ghostscript path for PDF/X-1a / PDF/X-4 conversion
Click Save — disabled until the form is valid (realtime per-field validation)
Tip: required fields are marked with a red *. Each field shows its own concrete error message rather than a single aggregated banner.
Controlling a hot folder
Start — begins watching. Status flips to Running within 1-2 seconds
Stop — halts watching (in-flight jobs finish normally)
Restart — stop + start, useful after editing the template
Edit — modify the selected hot folder; on Save the manager diffs old vs new config and only restarts the runner if something material changed
Remove — deletes the hot folder from configuration; files in the folders are left intact
Open input / output / logs — quick shortcuts that open the folders in Explorer
Counters: OK (success), Failed, Queue (jobs waiting to be processed)
Last error: a red strip appears only when the selected hot folder has an error — operator sees what happened without diving into logs
License banner: red ⚠ at the top when the license is invalid — with an Open License Manager button
Recovery banner: blue ↻ informs you when the app, after start, recovered interrupted jobs from the previous session
Production-grade resilience
Hot folders are designed for 24/7 print-shop production:
File-stability detection — multi-stage probe (size + mtime + exclusive lock test). Eliminates the race where a 200 MB PDF copy over SMB is still in progress while Windows already raised Created. Tolerates Defender holding an exclusive lock for 2-5 seconds
Polling fallback for SMB/DFS — when FileSystemWatcher lies on network shares, a second mechanism does snapshot diff every N seconds. Both sources active in parallel, deduplicator removes duplicates
Anti-duplicate based on a fingerprint (SHA-256 of the first 1 MB of the file + size + mtime). Re-export of the same file after edit = different fingerprint = new job. Same file dropped twice unchanged = skipped
Crash recovery — when the app crashes mid-export, the SQLite ledger holds a "reserved" record. On next start, files in .work return to input and are reprocessed. A UI banner reports how many jobs were recovered
Polly v8 retry with exponential backoff and jitter — separate policies for I/O (5×, 200ms base), export (3×, 2s base) and ledger (8×, 50ms — guards against SQLITE_BUSY)
Process-wide Ghostscript ceiling — without it, N hot folders × M jobs × ~500 MB RAM gs killed the machine. Default cap: 2 gs processes concurrently
License check per job + periodic — host re-validates the license at start and every 60 minutes. Each export validates one more time. Expiry during 24/7 work stops runners with a clear message
Where the configuration lives
Configuration:%APPDATA%\imPRESS Studio\hotfolders.json (atomic write, hand-editable, validated on every load, broken file rotated to .broken-{timestamp})
SQLite ledger:%LocalAppData%\imPRESS Studio\state\hotfolder.db (WAL mode, auto-prune of entries older than 30 days)
The hot folder host can run from the command line without a window:
"imPRESS Studio.exe" hotfolder run
The daemon lives until Ctrl+C. This is the natural step toward running as a Windows Service in a future release.
Required: hot folders only run with a valid license. The host refuses to start runners when the license is invalid or expired. The same applies to hotfolder run from the CLI.
New in 1.2.3
Application updates
imPRESS Studio checks for new releases automatically at startup (once per day, silent background check) and pulls the installer from GitHub Releases. If you'd rather control timing, you can force a manual check.
Manual update check
Menu Help → Check for updates…
The app queries the GitHub API for the latest release in repo dnblsr-lab/imPRESS-Studio.
You get one of three results:
Update available — with a link to the changelog and a Download & install button.
You're on the latest version — nothing else to do.
Check failed — no internet, GitHub down, or rate-limited. Try again later.
How install works
After clicking Download & install, the app fetches imPRESS_Studio-Setup.exe, verifies the SHA-256 against GitHub, closes the window and launches the Inno Setup installer. Once done, the installer starts the new version — your templates, license, hot folders and settings carry over.
Disabling auto-check
Menu File → Settings → Updates — uncheck Check automatically. The manual check option remains available.
Corporate networks: if a proxy blocks api.github.com, the app reports Check failed — not a program bug. Configure proxy via HTTPS_PROXY env vars or ask IT for a whitelist.
License
Activation & status
imPRESS Studio uses a machine-bound license. The activation window opens on first launch:
Copy the machine ID — a unique hash of your computer
You receive an activation key (Base64) or a license file (.json)
Paste the key in the activation window and click Activate — or load the license file
License tiers
Trial — 30 days, full functionality
Full — 6-month, annual or perpetual
Note: the license is bound to a specific computer. Replacing the motherboard, CPU, or reinstalling the OS may require re-activation — just contact us, we re-issue keys promptly.
Shortcuts
Keyboard & mouse shortcuts
Ctrl+O
Load PDF
Ctrl+P
Plan imposition
Ctrl+E
Export to PDF
Ctrl++ / Ctrl+-
Zoom in / out
Ctrl+0 / F
Fit to window
R
Rotate view 90°
← / →
Previous / next sheet
F1
Open in-app help
T
Toggle Trim/Bleed guides in preview (new in 1.2.3)
Mouse wheel
Cursor-anchored zoom
Click & drag
Pan
Drag & drop PDF
Load file by dropping on window
Glossary
Imposition & print terminology
Imposition
Arranging document pages on press sheets so that, after printing, folding and trimming, the result is a publication with correct pagination.
Signature
A group of pages printed on a single sheet. Typically 4, 8 or 16.
N-Up
Number of publication pages on one sheet side. X×Y = X horizontal × Y vertical.
Bleed
Artwork extending beyond trim.
Trim
Final page size after cutting.
Creep
The phenomenon where inner pages of a saddle-stitched book stick out past outer pages due to paper thickness.
PDF/X-4
ISO 15930-7 standard for print-ready PDFs — supports transparency, layers and ICC.
Preflight
Automatic validation of a PDF for print readiness.
Registration marks
Crosshairs on the sheet for precise CMYK alignment.
OCG (Optional Content Groups)
PDF layers that can be toggled on and off.
Hot folder
A folder watched by software — every dropped file is processed automatically.
Troubleshooting
Common problems
"No active license"
Open License in the header and paste the activation key or load the .json license file.
PDF/X-4 export does not work
Install Ghostscript from ghostscript.com and add it to PATH. Alternatively specify the path to gswin64c.exe in export options.
Preview shows black pages
Check the file status in Info (left panel). Some restricted PDFs require the protection to be removed first.
Pages overflow the sheet
Trim + bleed + gutter + sheet margin exceed the physical sheet size. Pick a larger sheet or reduce margins.
"File is in use" on export
Close the output file if open in Acrobat, a browser or another program — or pick a different path.
Slow export of large files
PDF/X-4 conversion is the slowest stage. Consider exporting without PDF/X-4 and converting in batch with a Ghostscript script overnight.