
1. Introduction
imPRESS Studio is a PDF imposition application for print shops, prepress studios and label production. It takes press-ready PDF files, lays their pages out on press sheets according to the selected binding method, adds printer marks and exports a production-ready file — optionally as PDF/X.
1.1. What imposition is
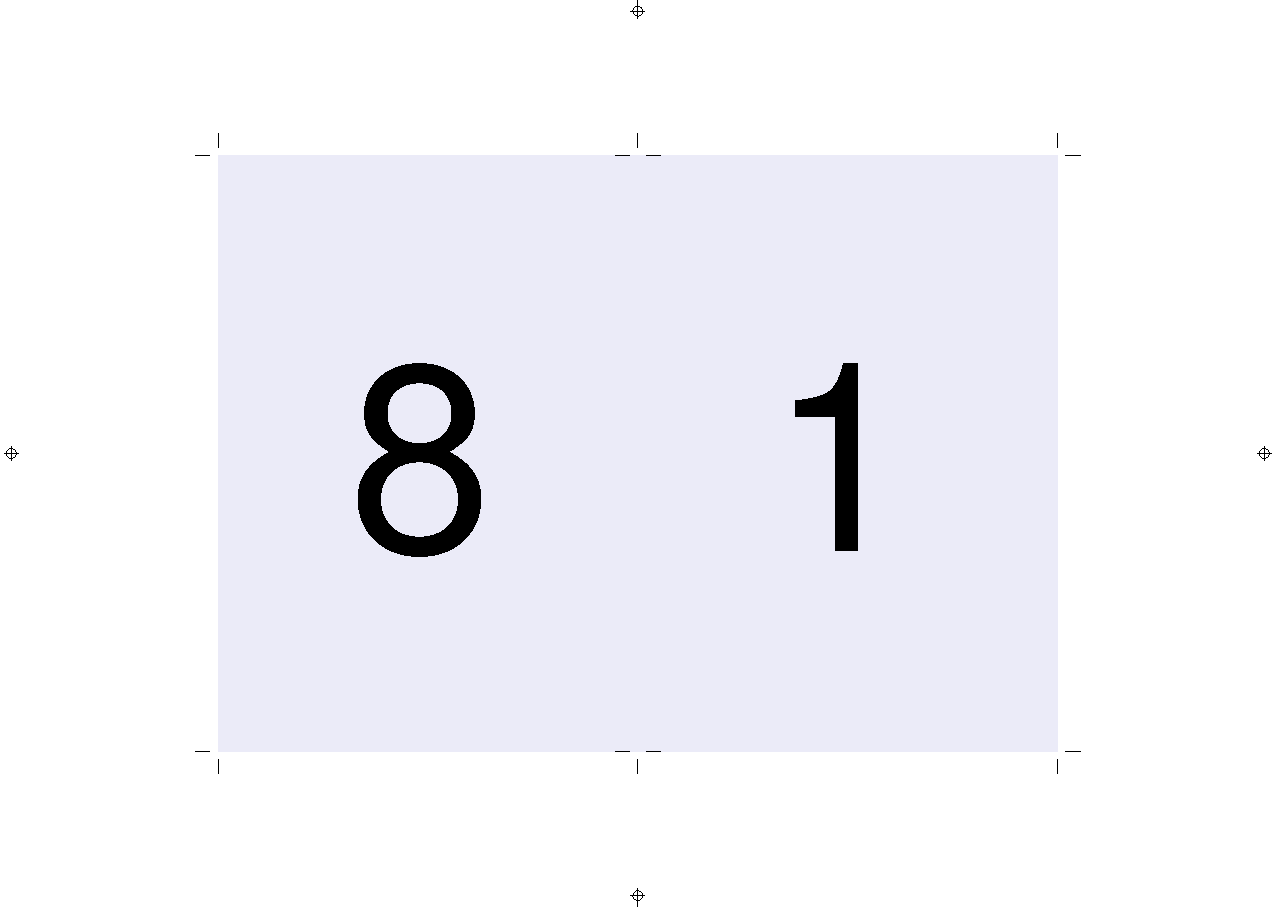
Imposition is the arrangement of a publication's pages on a press sheet in the order and orientation that yields correct pagination after printing, folding and trimming. In an 8-page saddle-stitched booklet, for example, the first sheet's front carries pages 8 and 1 (not 1 and 2) — the program takes care of that arithmetic for you.
1.2. Typical applications
- Business cards, flyers, invitations — N-up ganging with double-sided work,
- Booklets and catalogues — saddle-stitch and perfect binding with creep compensation,
- Folded leaflets — Z-fold, gatefold, accordion,
- Labels and stickers — roll-fed production and step & repeat, Summa OPOS cutter marks,
- Repeat production — hot folders and the command-line mode.
2. Installation and license activation
2.1. Requirements
| Component | Requirement |
|---|---|
| Operating system | Windows 10 / 11, 64-bit |
| Memory | 4 GB RAM minimum (8 GB recommended for large formats) |
| Disk | approx. 400 MB (Ghostscript is bundled) |
| Privileges | day-to-day use requires no administrator account — user data lives in the user profile |
2.2. Installing
- Run the downloaded
imPress_Studio-x.y.z-Setup.exe. - The installer walks you through the location choice and creates shortcuts.
- The application starts automatically after installation.
2.3. Activating the license
Manual activation (paid license, or when there is no internet on first launch):
- Open the activation window (it appears automatically when the trial couldn't start).
- Paste your activation key (a long text string) and confirm.
- The program verifies the key's signature and stores the license in your profile:
%APPDATA%\imPRESS Studio\licenses\license.json.
The license is bound to the machine by three components (network adapter, disk, mainboard identifier) — replacing one of them does not invalidate the license. The title bar shows the license state (e.g. "Trial · 21 days"); the badge turns to a warning tint 7 days before expiry.
3. Quick start — your first imposition in 5 steps
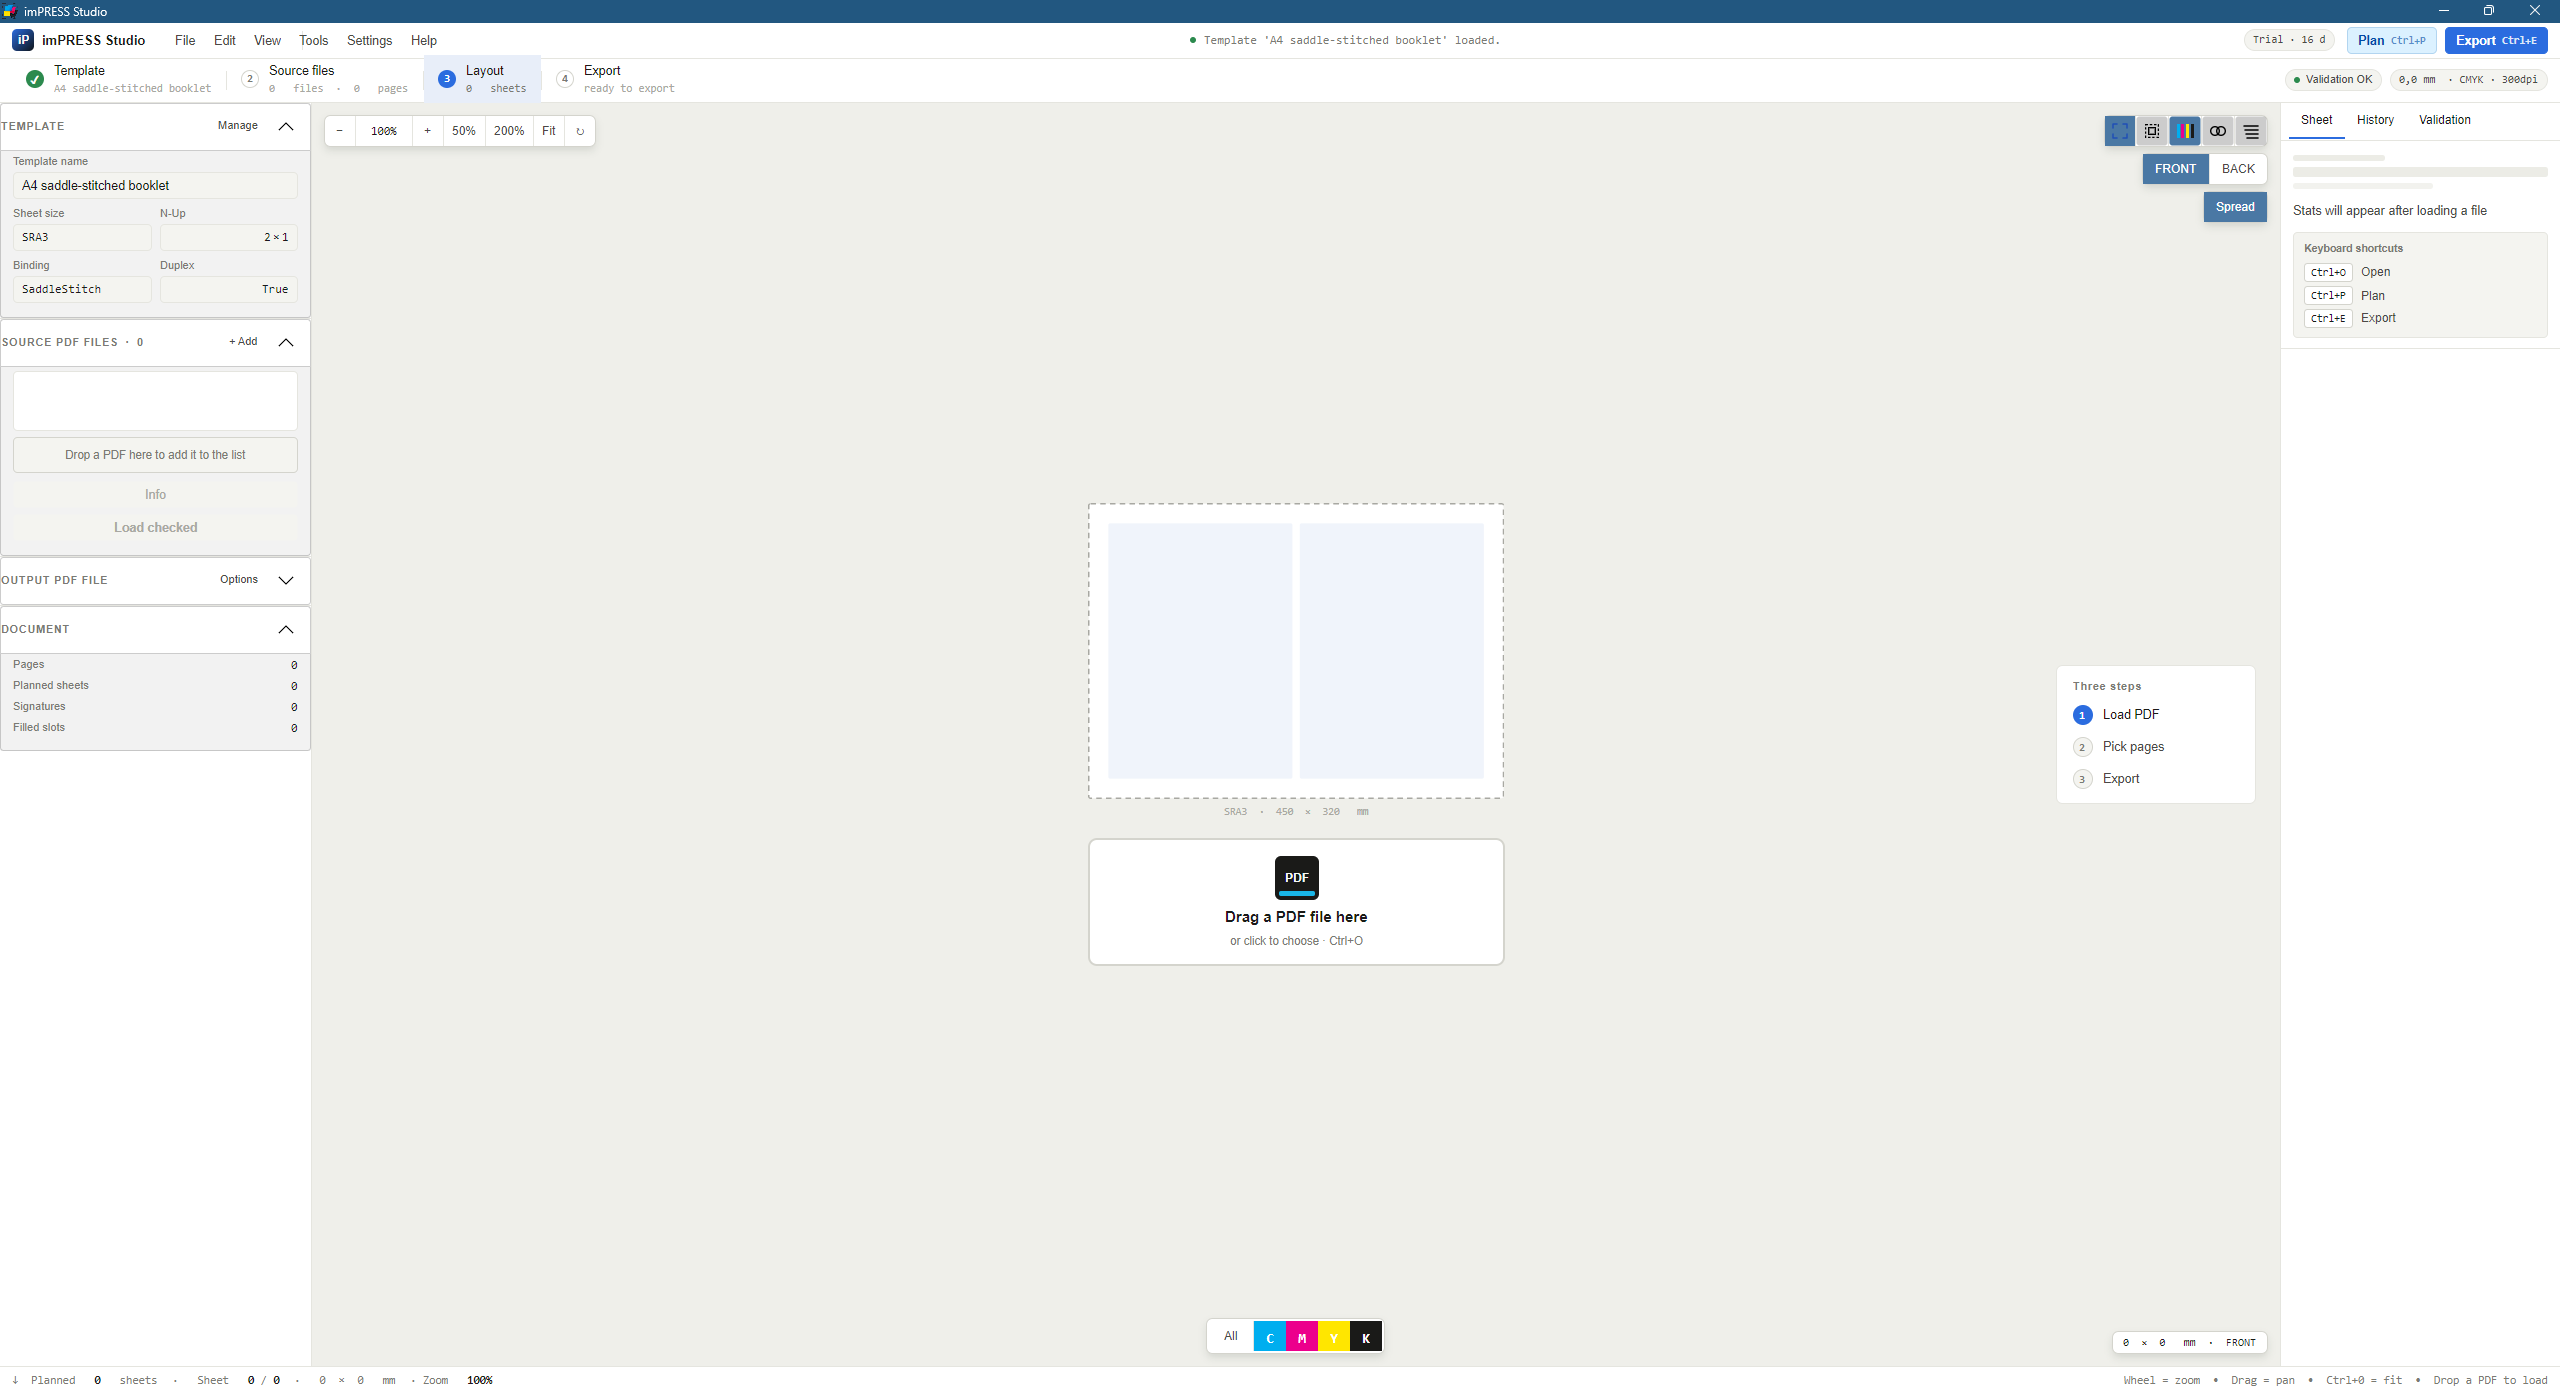
- Pick or create a template — click "Manage templates" and choose a ready preset (e.g. "Business cards 6-up SRA3") or build your own (chapter 6).
- Add PDF files — "Add files…" (Ctrl+O) or drag & drop onto the window. Files are analysed immediately and shown page by page.
- Plan the imposition — "Plan imposition" (Ctrl+P). The canvas switches from plain pages to finished sheets with marks.
- Check the preview and preflight — browse the sheets (←/→ keys), enable the bleed guides, review the preflight report.
- Export — "Export…" (Ctrl+E), choose the output file and options (PDF/X, cutting guide; numbering is configured in the template). The finished PDF lands on disk.
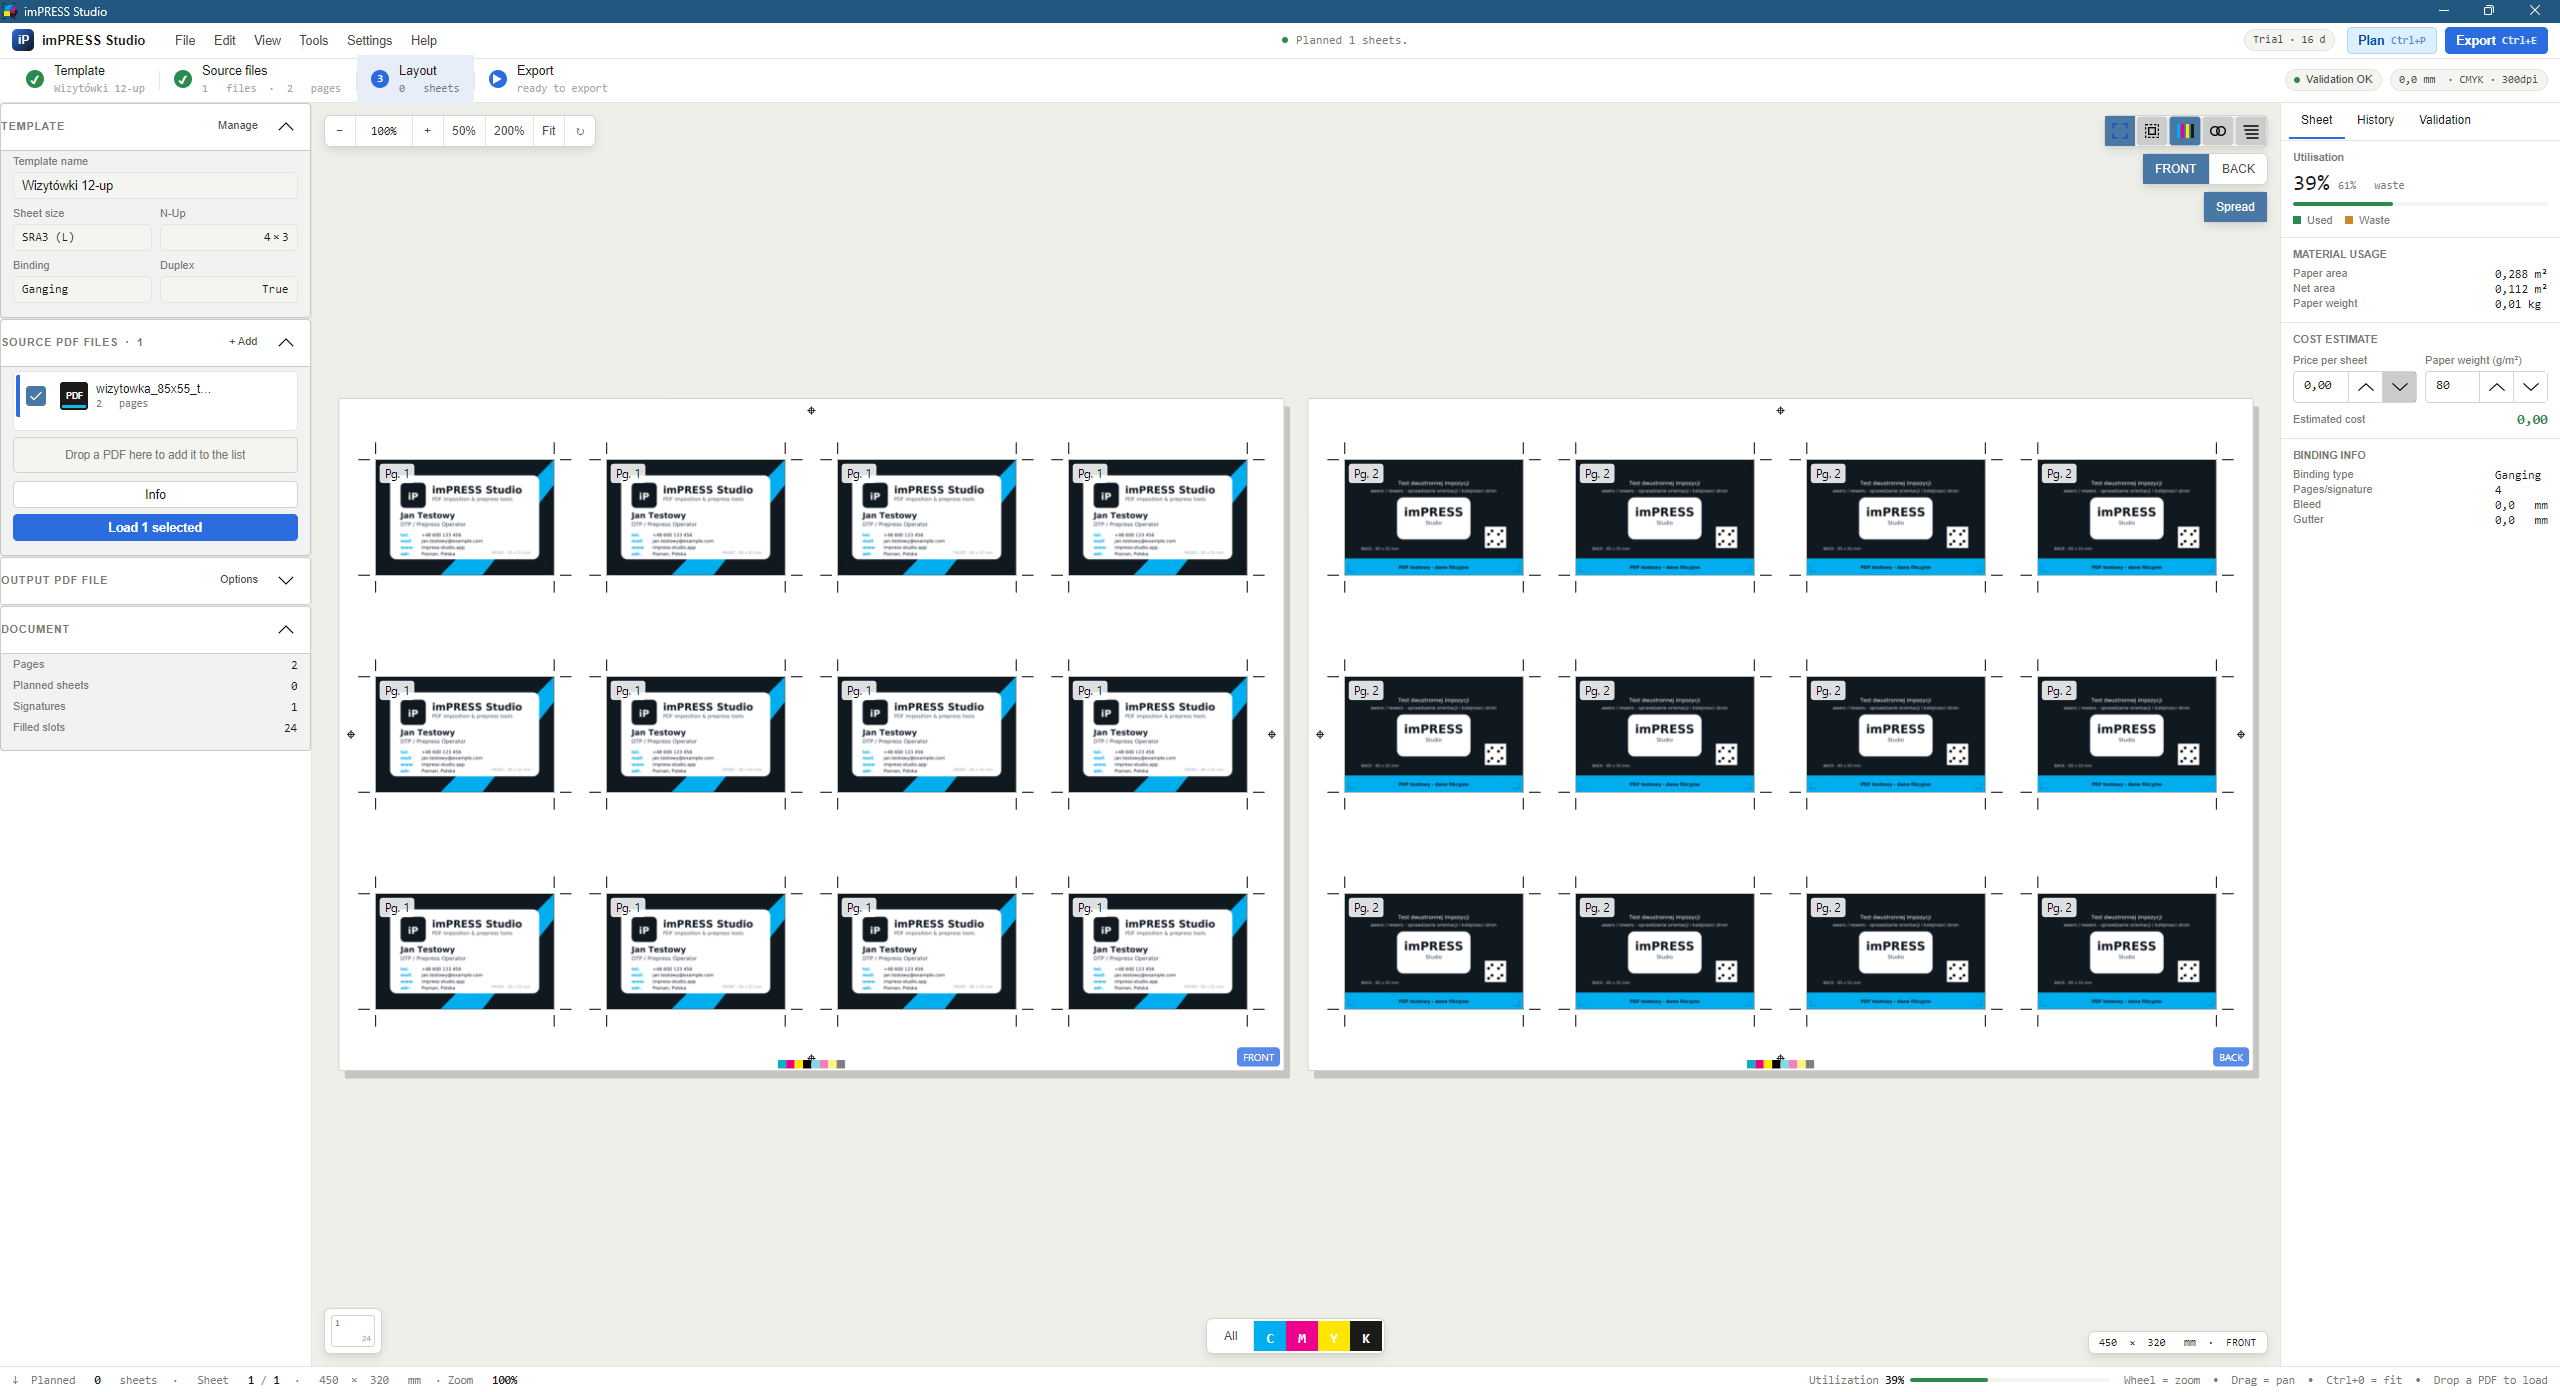
4. User interface
4.1. Main window layout
| Area | Purpose |
|---|---|
| Step rail (left edge) | Guides the workflow: Template → Source files → Plan → Export. The active step is highlighted. |
| Source files panel | Added PDFs with page counts; checkboxes select which files enter the job. Buttons for reordering, merging and removal. |
| Preview canvas | Interactive preview of pages (before planning) or sheets (after planning), with zoom, pan and inspection tools. |
| Inspector (right panel) | Active template parameters, job statistics, selected-slot editing, operation history with restore points. Collapsible. |
| Status bar | Current message, export progress bar, sheet dimensions, license badge. |
4.2. Languages and units
- Interface languages: Polish and English — switching applies instantly, no restart.
- Units: millimetres or inches. All dimension fields and readouts convert automatically; with inches selected, the built-in template presets switch to the US set (Letter, Half-Letter, 3.5×2″ business card).
4.3. Keyboard shortcuts
| Shortcut | Action |
|---|---|
| Ctrl+O | Add source files |
| Ctrl+P | Plan imposition |
| Ctrl+E | Export |
| Ctrl++ / Ctrl+− | Zoom in / out |
| Ctrl+0 or F | Fit view (reset zoom and pan) |
| → / ← | Next / previous sheet |
| R | Rotate sheet view by 90° |
| Ctrl+Z / Ctrl+Y | Undo / redo a slot edit (inspector) |
| F1 | Help |
The Workflow button and Ctrl+Shift+W open the job panel; chapter 18.5 explains the queue and board.
5. Source files
5.1. Adding and selecting files
- Add files with the "Add files…" button, Ctrl+O, or by dragging PDFs onto the window.
- Every file is analysed on the spot: page count, dimensions, fonts, images, colour spaces.
- Checkboxes decide which files enter the job. A single checked file is used directly; several checked files are merged in list order (reorder with the ↑/↓ buttons).
- "Load checked" builds the job source and shows a plain page preview. Only "Plan imposition" produces sheets.
5.2. Merge to file
The "Merge" button (enabled with ≥ 2 checked files) merges the selection into a PDF on disk without touching the current job — handy for preparing combined material.
5.3. File information
Since 1.5.3 the window is split into tabs (the main-window inspector pattern): Overview (file, metadata, properties) / Validation / Colour & PDF/X (standard, OutputIntent, spot colours, transparency) / Page content (boxes, images, fonts) / Ink coverage — no more expanders.
The file-info window shows full metadata: PDF version, author, producer, dates, image count, colour spaces, transparency, encryption, and per-page dimensions (MediaBox/TrimBox). At the bottom you will also find the ink-coverage scan — since 1.5.0 executed natively by the imPRESS engine (pages rendered by the internal rasterizer, pixels converted to CMYK through the export ICC profile, SWOP fallback; Ghostscript is not needed): average C/M/Y/K coverage of every page with the Σ total — pages above 250% flagged ⚠ (a composite page average, not a per-pixel maximum).
5.4. Source, imposition and saved output
File information distinguishes the source PDF from the planned layout. After planning, inspect actual sheets/roll segments, front/back sides, occupied and blank slots and source-page coverage, including manual edits. The layout summary links to the last successful export of that plan, including PDF/X. Opening it analyses the saved PDF itself; source preflight is not the exported file's verdict.
6. Imposition templates
A template describes the job's entire geometry: sheet format, trim size, bleed and margins, binding type and marks. Templates are stored as JSON files and can be shared between workstations.
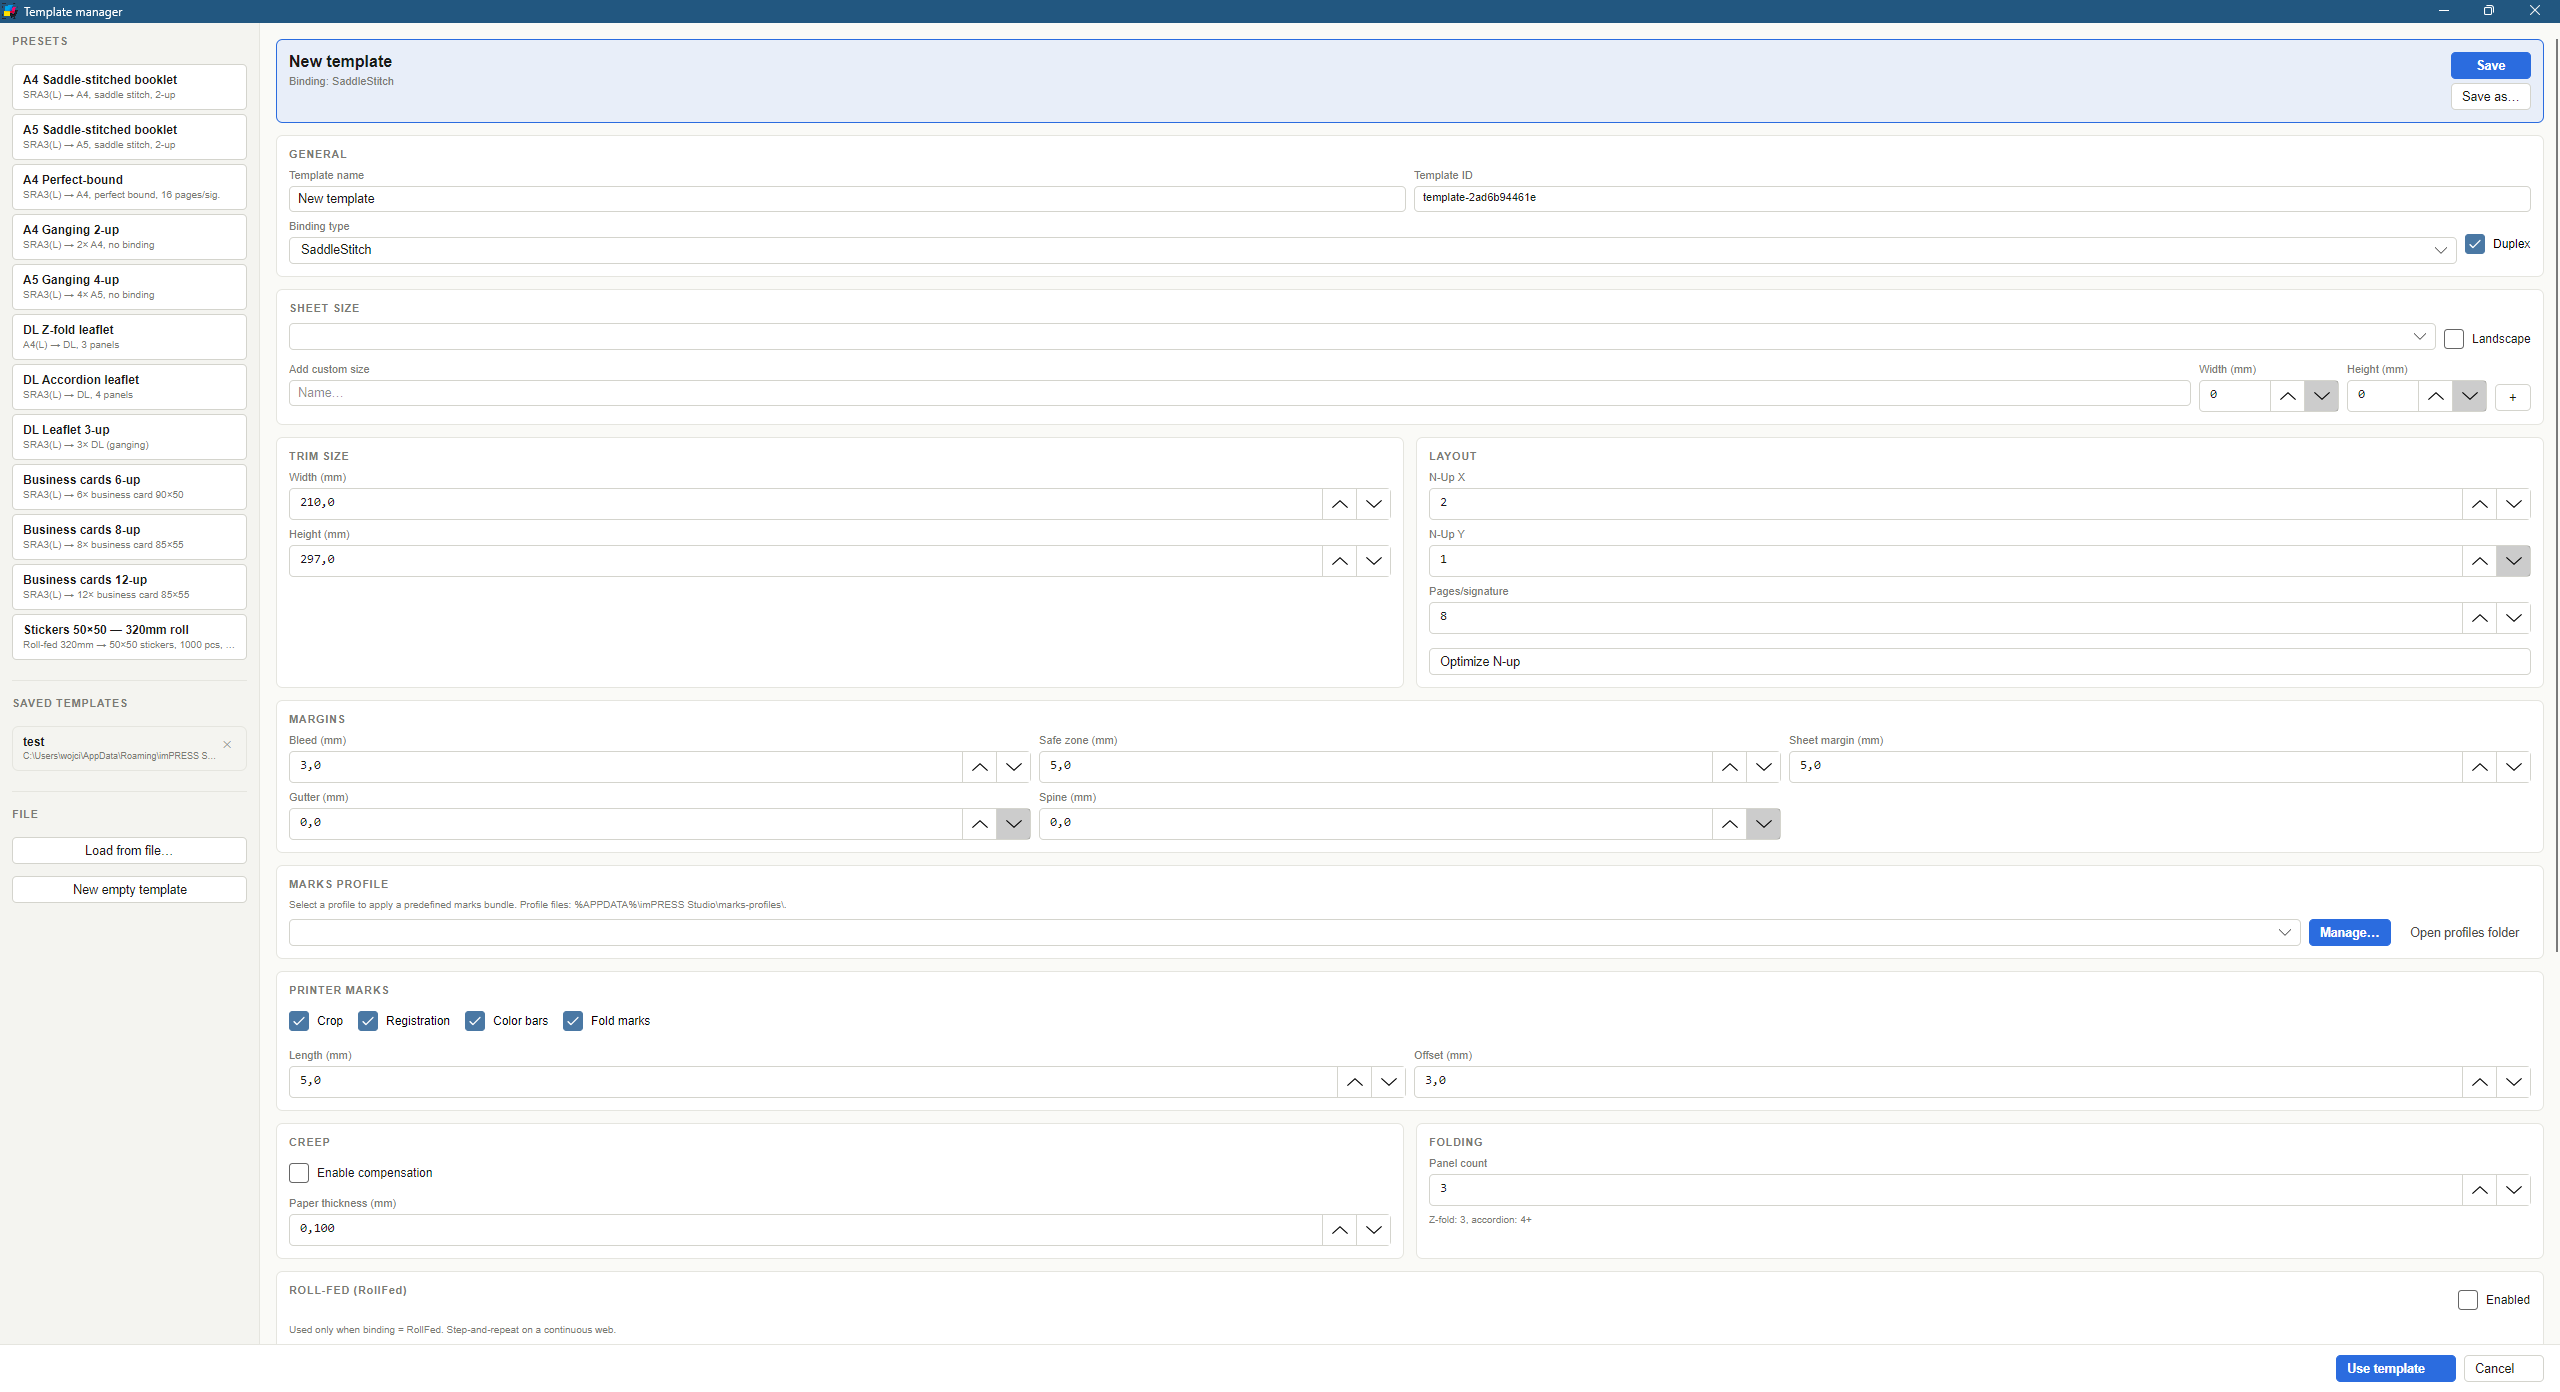
6.1. Template parameters
| Parameter | Meaning | Typical value |
|---|---|---|
| Sheet | Physical paper size; presets (A/B/SRA/RA, Letter, Tabloid, 12×18, 13×19, ANSI) in portrait or landscape, or a custom size | SRA3 320×450 mm |
| Trim | Size of a single finished page after cutting | e.g. 90×50 mm |
| Bleed | Artwork allowance past the cut line | 3 mm (0.125″) |
| Safe zone | Inset from the cut line that should contain all critical content | 3–5 mm |
| Gutter | Gap between adjacent items on the sheet | 0–5 mm |
| Sheet margin | Clearance from the sheet edge (room for marks and grippers) | 10 mm |
| Spine | Spine width — perfect binding only | per block thickness |
| N-up X × Y | Item count across and down (grid layouts) | e.g. 3×5 |
| Duplex | Double-sided work — see the binding descriptions | on |
| Pages per signature | Saddle/perfect binding: section size (multiple of 4; multiple of 8 for the 8-page form) | 8 / 16 |
| Creep | Creep compensation: paper thickness in mm — see 7.1 | 0.1 mm |
6.2. Built-in presets
The "Ready presets" list ships proven configurations: A4/A5 booklets (saddle, perfect), A4/A5/DL flyer ganging, 6/8/12-up business cards, DL Z-fold and accordion, roll labels and Step & Repeat. With inch units active the set switches to US formats. Load a preset, adjust it and save under your own name.
6.3. Template suggestions
"Suggest template from PDF…" measures the loaded file's pages and proposes matching products from the library (business card, postcard, flyer, label…), in two tiers:
- Matched to your sheet — recalculated for the current template's sheet and margins (you stay on your paper),
- From the library — the preset's canonical form (e.g. a label straight onto a roll job).
Each suggestion shows the items-per-sheet count and paper utilisation. Picking one fills the template editor immediately.
The engine also looks at the document's page count: a file of 5+ pages at A4/A5/A6 size additionally gets a saddle-stitched booklet proposal, a 49+ page document a perfect-bound catalogue, and a document of exactly 5–6 DL pages a Z-fold leaflet with ready fold geometry. Their rationale line explains that the page count triggered them; on a dimensional tie the multi-page product ranks above the flat one.
6.4. Layout optimizer and sheet advisor
The optimizer compares the current N-up against the best possible packing for the given sheet, trim, bleed and spacing — including a 90° item rotation. When a denser layout exists, one click applies it.
The "Compare sheets…" button opens the sheet advisor: a ranking of every paper size by utilisation for the current item (e.g. "SRA3 · 15 pcs · 86% · 3×5"). Top of the list = least waste.
6.5. Ticket numbering (variable data)
The "Ticket numbering" section stamps a consecutive number on every item — ideal for tickets, coupons and raffle stubs. Parameters: start number, step, .NET format with the {0} token (e.g. No {0:0000} → "No 0001"), position (9 anchors), offsets and font size. The sequence runs continuously across all sheets (sheet → slot), on fronts; the preview shows exactly the numbers that land in the PDF.
6.6. Page, sheet and ticket numbering — Templates → Extras
Sheet numbering is a template setting, no longer an export checkbox. Open the template manager, edit a template and choose Extras. Enable the required numbering section, configure it, save, then plan the job and check the preview.
| Type | What it counts | Format |
|---|---|---|
| Page | The source PDF page inside each item, on fronts and backs; blank slots are skipped. Set a start number where needed. | {page}, {pages} |
| Ticket | An independent sequence across products, not the source page number. | The existing {0} format, e.g. {0:0000}. |
| Sheet | Press sheets. A sheet's front and back share one number. | {sheet}, {sheets}, {side}, {filename}, {template}, {jobid}, {date}, {date:format}. |
For sheets choose start, step (including negative), both sides/fronts/backs, one of nine anchors and separate X/Y offsets. Mirroring on the back retains the physical corner after turning the stack. Usable-area anchoring follows margins rather than the paper edge. Registration black is available. Check that a slug containing {sheet} does not duplicate the same numbering unintentionally; the editor warns but permits saving.
Example: {sheet} / {sheets} — {side}. Ticket number formatting and sheet tokens are different conventions: do not use ticket {0:0000} as a sheet format. The saved template carries numbering into desktop export, hot folders and CLI.
6.7. Validation before applying a template
Suggestion cards display validation diagnostics; invalid layouts cannot be applied. Read added blank-page/signature padding and distinguish publication/panel yield from flat-item N-up or roll-segment output. Recheck sheet size, source orientation, binding, folding panels and marks. Applying revalidates the layout; cancelling the dialog does not apply the selected card.
7. Binding types and layouts
| Binding | Use case | How it works |
|---|---|---|
| Saddle stitch | booklets, catalogues up to ~64 pp. | Nested spreads stapled at the spine. Page count is padded to the signature size. Modes: classic 2-up, stacked copies (sheet cut into strips before folding), 8-page signature (2×2 grid, top row rotated 180°). |
| Perfect bound | books, thick catalogues | Sections stacked in sequence and glued; a spine width is reserved between page columns. |
| Wiro / spiral | calendars, notebooks | Every page printed once, ganged N-up; with duplex, consecutive page pairs share one leaf (verso mirrored about the vertical axis). |
| Ganging (N-up) | business cards, flyers, invitations | Two slot-filling modes (the Ganging card). RepeatItem (default): an X×Y grid of identical items; duplex pairs pages 1-2 → sheet 1 (front/back), 3-4 → sheet 2, and so on. ConsecutivePages: slots are filled with consecutive document pages (a 5-page document 2-up → 1+2, 3+4, 5); with duplex each slot is its own leaf and the verso is mirrored. |
| Z-fold | 6-page DL leaflets | 3 panels folded in a "Z". Sheet front: pages [2·3·4], back: [5·6·1]. |
| Gatefold | invitations, covers | Wings folding inward; 3- or 4-panel variant. Wings are narrowed by a "fold reduction" (1–3 mm) so they do not collide at the centre. |
| Accordion | maps, price lists | N panels folded alternately; the front carries the odd pages [1·3·5·…]. |
| Roll-fed | labels, stickers | Step-and-repeat on a web: roll width from the template sheet, length computed from the repeat count; optional segment splitting and automatic 90° rotation when it fits more items per row. Duplex: backs mirrored across the web. |
| Step & Repeat | sheet-fed label production | One page replicated in a grid; rotation patterns (alternate rows / columns / checkerboard at 180°) and centre-to-centre pitch spacing instead of gaps. |
7.1. Work-and-turn — both sides from one form
For Ganging, duplex has two production modes (a selector next to the Duplex checkbox): classic Sheetwise (separate front/back pages in the file) and WorkAndTurn — one form carries the fronts on the left half of the grid and the backs on the right, at exactly mirrored positions. The sheet is printed, turned left-to-right and printed again with the same form: half the plates, and every cell yields a complete duplex product after cutting. Requires an even N-up X.
7.2. Creep compensation
In saddle-stitched work the inner leaves protrude beyond the outer ones and lose the most paper at the fore-edge trim. To keep margins even, the content of inner leaves shifts toward the spine — one paper thickness per nesting level. Just enable creep and enter the paper thickness (e.g. 0.1 mm for 100 gsm offset); the offsets are computed automatically and can be visualised in the preview.
8. Sheet preview
8.1. Navigation
- ←/→ keys or the thumbnails switch sheets; Ctrl+wheel zooms, dragging pans.
- Spread view shows a sheet's front and back side by side; the side toggle shows one side at a time.
- R rotates the sheet view by 90° (display only — the job is unchanged).
8.2. Quality-control tools
| Tool | Purpose |
|---|---|
| CMYK channels | Toggle individual process channels on screen (separation simulation). |
| Overprint simulation | Multiply-blend darkening — a quick look at where inks will overlap. |
| Eyedropper | Reads the colour under the cursor in RGB and CMYK (indicative values from the preview raster). |
| Trim/bleed guides | Outlines of the cut line and bleed on every item — instantly shows whether artwork reaches the bleed. |
| Creep visualisation | Makes the creep-compensation shifts visible across sheets. |
| Front/back registration | Overlays the back side mirrored (50% opacity) on the front — like holding the sheet against the light; layout misregistration shows instantly. |
| Mark filters | Hide individual mark types on screen (does not affect export; only marks enabled in the profile are available). |
8.3. Slot editing (inspector)
Clicking an item on the canvas selects it; the inspector then shows its X/Y position, size, rotation and source page. You can edit the values, rotate the item by 90°, or blank the slot (intentionally empty). Export reproduces exactly what the canvas shows — including manual edits.
8.4. History and restore points
Every significant operation (load, plan, export, edits) is logged in the inspector's history. Hovering an entry reveals a restore button that brings back the entire working state from that moment (files, template, layout, export options). Files already written to disk are not touched.
8.5. "Preview" tab — page thumbnails with edits (since 1.5.3)
After a file is loaded the inspector opens the Preview tab with thumbnails of every page of the loaded document (for a multi-file load — the whole merge, in canvas order). Page count is uncapped: bitmaps exist only for thumbnails inside a sliding visibility window that follows your scrolling — a 1000-page book costs the same memory as a leaflet.
- Left click a thumbnail — shows that page on the main canvas (with an active imposition the canvas switches to the page preview; the plan survives, "Plan" brings the sheets back).
- Right click — the edit menu: rotate 90° CW / CCW / 180° (lossless /Rotate flip), grayscale (this page), grayscale (whole file) and Revert file edits. Grayscale runs entirely on the imPRESS engine — no Ghostscript (vectors by luminance, images pixel-by-pixel to DeviceGray).
- Non-destructive: every edit produces a temp working copy — the original file is never modified. Analysis, preview, merge, imposition and export automatically use the edited version (a banner above the thumbnails flags active edits).
- File → Save PDF… saves the selected file as the preview shows it (edits included) without imposition. An options dialog offers the same choices as export: format (plain PDF / PDF/X-1a / X-3 / X-4), engine (Auto / imPRESS Export Engine / Ghostscript), PDF version (1.4–1.7) and ICC profile. Plain save is a copy with edits; PDF/X produces a print-standard file (X-4 natively, X-1a/X-3 via Ghostscript). The original on disk stays untouched.
Contour-cutter/OPOS markers have their own preview filter, separate from crop marks. Preview filters do not change exported marks. A logo overlay appears in the sheet and template previews; a missing or undecodable logo may show its footprint instead of artwork.
9. Printer marks
Marks are configured in marks profiles — named bundles assignable to templates. Built-in profiles ship with the program: Default, Offset (coated), Digital print, Wide format and No marks; each can be duplicated and customised.
| Mark | Description and options |
|---|---|
| Crop marks | Ticks at every item corner; length (default 5 mm), offset from the cut (3 mm), stroke width, ink: black or registration black (100/100/100/100). |
| Registration marks | Styles: target, plus, diamond, boxed crosshair (Heidelberg); positions: edge centres, corners or both; size and edge offset. |
| Control bars | CMYK bar (variants: 4-patch process, 8-patch with tints, GATF 11, Brunner 21) on the first half of the edge + a grayscale K wedge (8 steps of 12.5%) on the second half — neither collides with the centre registration mark. |
| Fold marks | Dashed ticks on the spine axis (saddle stitch). |
| Slug line | A text line along an edge with tokens: {filename}, {date}, {date:format}, {sheet}, {sheets}, {side}, {jobid}, {template}. |
| Summa OPOS markers | Solid black squares at the corners of the cut area for cutting plotters; the OPOS-XY variant adds a sheet label. Size (3 mm) and clearance (5 mm) configurable. Drawn on the front side only. |
| Barcode / QR | A job-tracking code in the sheet margin (Code 128 or QR) with token-based content as in the slug. The program warns when the code would overlap artwork. |
10. Preflight — checking files before print
Preflight runs on two levels: a quick check on every export and a deep prepress analysis with a report. Findings carry three severities: info, warning, error (errors block the export).
10.1. Key quick checks
| Code | Meaning |
|---|---|
BLEED_LOW | Template bleed below 3 mm. |
TRIM_MISMATCH | A page's TrimBox differs from the template trim (visual dimensions are compared — /Rotate pages do not raise false alarms). |
PAGE_COUNT_MISMATCH | File page count differs from the planned job (error). |
RGB_ONLY | The file uses RGB colour only — offset work needs conversion (the PDF/X export performs it). |
ENCRYPTED | Encrypted file — some workflows reject such PDFs. |
X1A_TRANSPARENCY | PDF/X-1a forbids live transparency (error for X-1a export; pick X-4 or flatten the file). |
TRIM_ROTATED | Pages match the template trim only after a 90° turn — rotate the template trim or the source pages (one aggregated hint). |
SIGNATURE_PADDING | Page count not a multiple of the signature — tells you how many blank pages will be appended to the booklet. |
SADDLE_TOO_THICK | Saddle stitch above 64 pages — severe creep and stapling problems; consider perfect binding. |
DUPLEX_ODD_PAGES | Duplex ganging with an odd page count — the last sheet will have an empty back. |
10.2. Deep prepress analysis
| Area | What is checked |
|---|---|
| Bleed | Missing BleedBox, zero/low/asymmetric bleed; content-level check: does artwork actually reach into the bleed (BLEED_CONTENT_UNUSED = white strips after trimming) and does it overflow the BleedBox. |
| Images | Effective DPI of every placement: error below the critical threshold, warning below the minimum, info when oversampled. |
| Fonts | Font embedding (unembedded fonts risk substitution at the RIP). |
| Colour | RGB in offset work, mixed colour spaces, spot colours. |
| Transparency | Transparency groups (relevant to PDF/X-1a). |
| Page geometry | Box consistency (Trim⊂Bleed⊂Media), page-size uniformity, declared PDF/X standard. |
| Page content | Tiny text below 4 pt (fills in or breaks up on press); registration-black text (C=M=Y=K=100% — 400% ink, coloured fringes; body text should be K-100); hairlines — zero-width strokes that vanish on the platesetter; blank pages (list of pages with no text or images); annotations and forms — comments, stamps and AcroForm fields usually do not print (flatten the file), hyperlinks reported as info. |
The report can be reviewed in a summary window before you confirm the export; in batch mode the "strict preflight" option aborts on any finding.
10.3. Reading results in 1.7.0
Geometry checks resolve inherited and indirect page boxes, page rotation and non-zero origins. Font embedding is checked from font programs; a subset-style name alone is not proof. Nested form resources, compressed metadata and embedded OutputIntent profiles are included in analysis.
Incomplete analysis is an error, not a clean result. Read the diagnostics, correct or replace the source and analyse again. PDF/X/PDF/A metadata is a declaration, not complete standards certification. A non-default UserUnit requires checking physical dimensions and DPI.
10.4. Ink-coverage scan
Read the actual CMYK profile named in the scan results. A selected CMYK profile is preserved; an incompatible RGB or missing selection can cause a scan-only CMYK fallback, disclosed with the result. This does not change export settings. Coverage is an estimate from the native scanner, not a measurement from the production device.
11. Export and PDF/X
11.1. Export options
| Option | Effect |
|---|---|
| Output file | Target PDF path; the write is atomic (temp file first) and an existing file gets a .bak copy. |
| Sheet range | E.g. 1-3,7 — which planned sheets to write (reprints of selected sheets). Sheet numbers in the marks keep their original values. |
| Source page range | E.g. 1-16 — only a slice of the source file is imposed (applied before planning). |
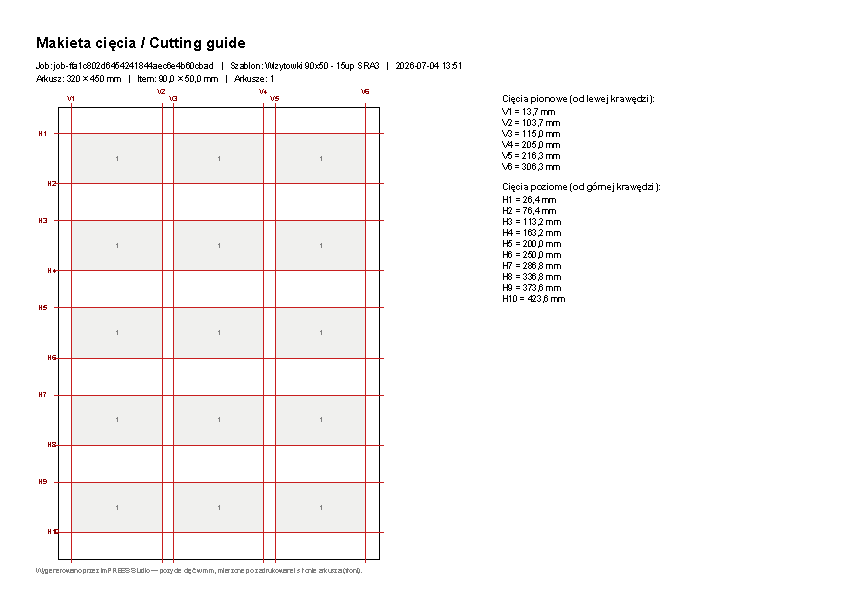
| Cutting guide | An extra page at the end of the file: a sheet schematic with numbered guillotine cuts and a position table in mm — see the example in 15.1. |
11.2. PDF/X
| PDF/X-1a:2001 | PDF/X-3:2003 | PDF/X-4:2008 | |
|---|---|---|---|
| PDF version | 1.4 | 1.4 | 1.6 |
| Transparency | not allowed (flattened) | not allowed (flattened) | allowed |
| Colour | CMYK + spot | CMYK + spot + ICC | CMYK + ICC |
| Typical use | legacy offset workflows | European offset (ECI) | modern standard — recommended |
The result is written next to the main export with a .pdfx1a.pdf, .pdfx3.pdf or .pdfx4.pdf suffix. The selected ICC profile (e.g. ISO Coated v2) is embedded as the OutputIntent.
11.3. PDF/X engine and PDF version
- imPRESS Export Engine (native) — packages PDF/X-4 without Ghostscript: embeds the ICC profile, XMP metadata, TrimBox and the 1.6 version stamp. It converts to CMYK both vector RGB (since 1.5.0) and RGB images — JPEG, 8-bit Flate rasters and Indexed palettes (since 1.5.6) — through the selected ICC profile (Windows colour engine, relative colorimetric intent). A two-stage gate (source analysis + a deep scan of the composed file) guarantees no file ever ships with a false conformance claim. With no profile selected the engine falls back to a bundled production profile (PSO Coated v3) and logs the choice.
- Ghostscript — flattens transparency and handles exotic colour constructs; required for PDF/X-1a, X-3, JPEG 2000 / 16-bit images and files using /DeviceRGB beyond fills and images (cs/CS operators, shadings).
- Auto (recommended) — the native engine when the file qualifies; Ghostscript otherwise.
- PDF version — for plain (non-PDF/X) exports you can pick the header version: 1.4, 1.5, 1.6 or 1.7. PDF/X modes enforce their spec versions (X-1a/X-3 → 1.4, X-4 → 1.6).
%APPDATA%\imPRESS Studio\icc, then among the bundled ones ({install dir}\icc). Drop an .icc/.icm file into the user folder and it appears in the list.
Preview in press colours 1.6.3 With a profile selected, Plan renders the sheet through the same profile export will embed as the OutputIntent: colours outside the CMYK gamut are pulled back to what the inks can hold. A PROOF badge under the preview names the profile. This is a screen simulation (sRGB → CMYK → sRGB, relative colorimetric) — it shows which colours will move and where to, not how the paper white will look; judging that needs a calibrated display and a press proof. Clearing the profile switches it off.
11.4. Numbering and reprints
Set numbering in Templates → Extras. Exporting a sheet range selects output from the full plan: ticket sequences, sheet numbers and total sheet count retain their place in the original run. For example, reprinting sheets 3–5 of 39 must not restart the ticket counter or report a three-sheet run. The cutting guide describes only the sheets actually written. Check the saved PDF before printing a re-run. A blocked export now includes the licence validator's reason.
12. Job statistics
After planning, the inspector shows job statistics:
- sheet and signature counts,
- paper utilisation — item area vs. sheet area (and the waste percentage),
- paper cost — once you enter a per-sheet price,
- paper weight — once you enter the grammage (gsm); useful for shipping quotes.
13. Hot folders — automation
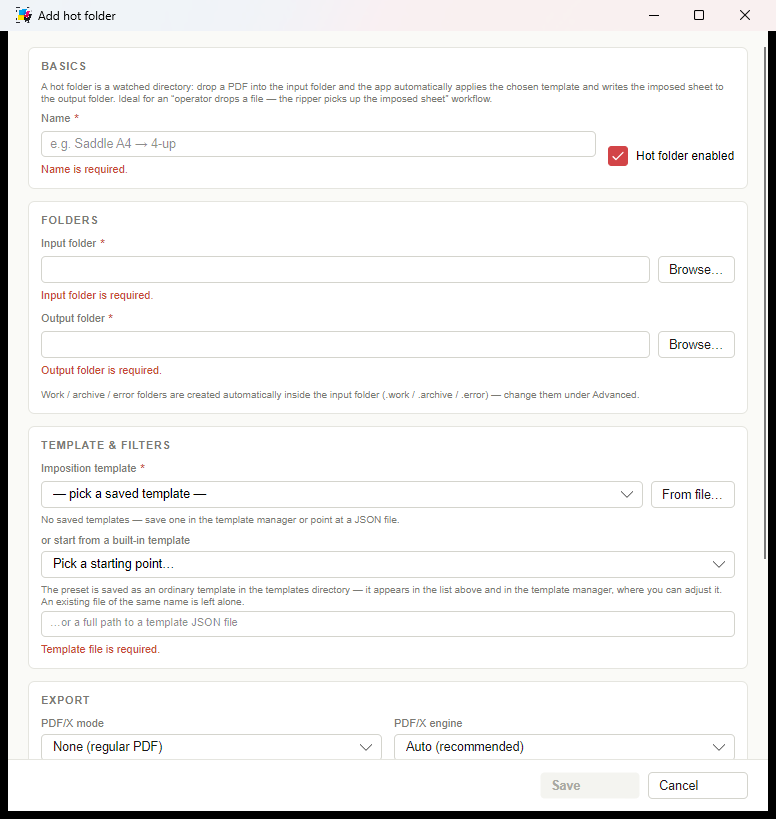
A hot folder is a watched directory: every PDF dropped into it is imposed automatically with the assigned template and written to the output directory. Ideal for repeat work.
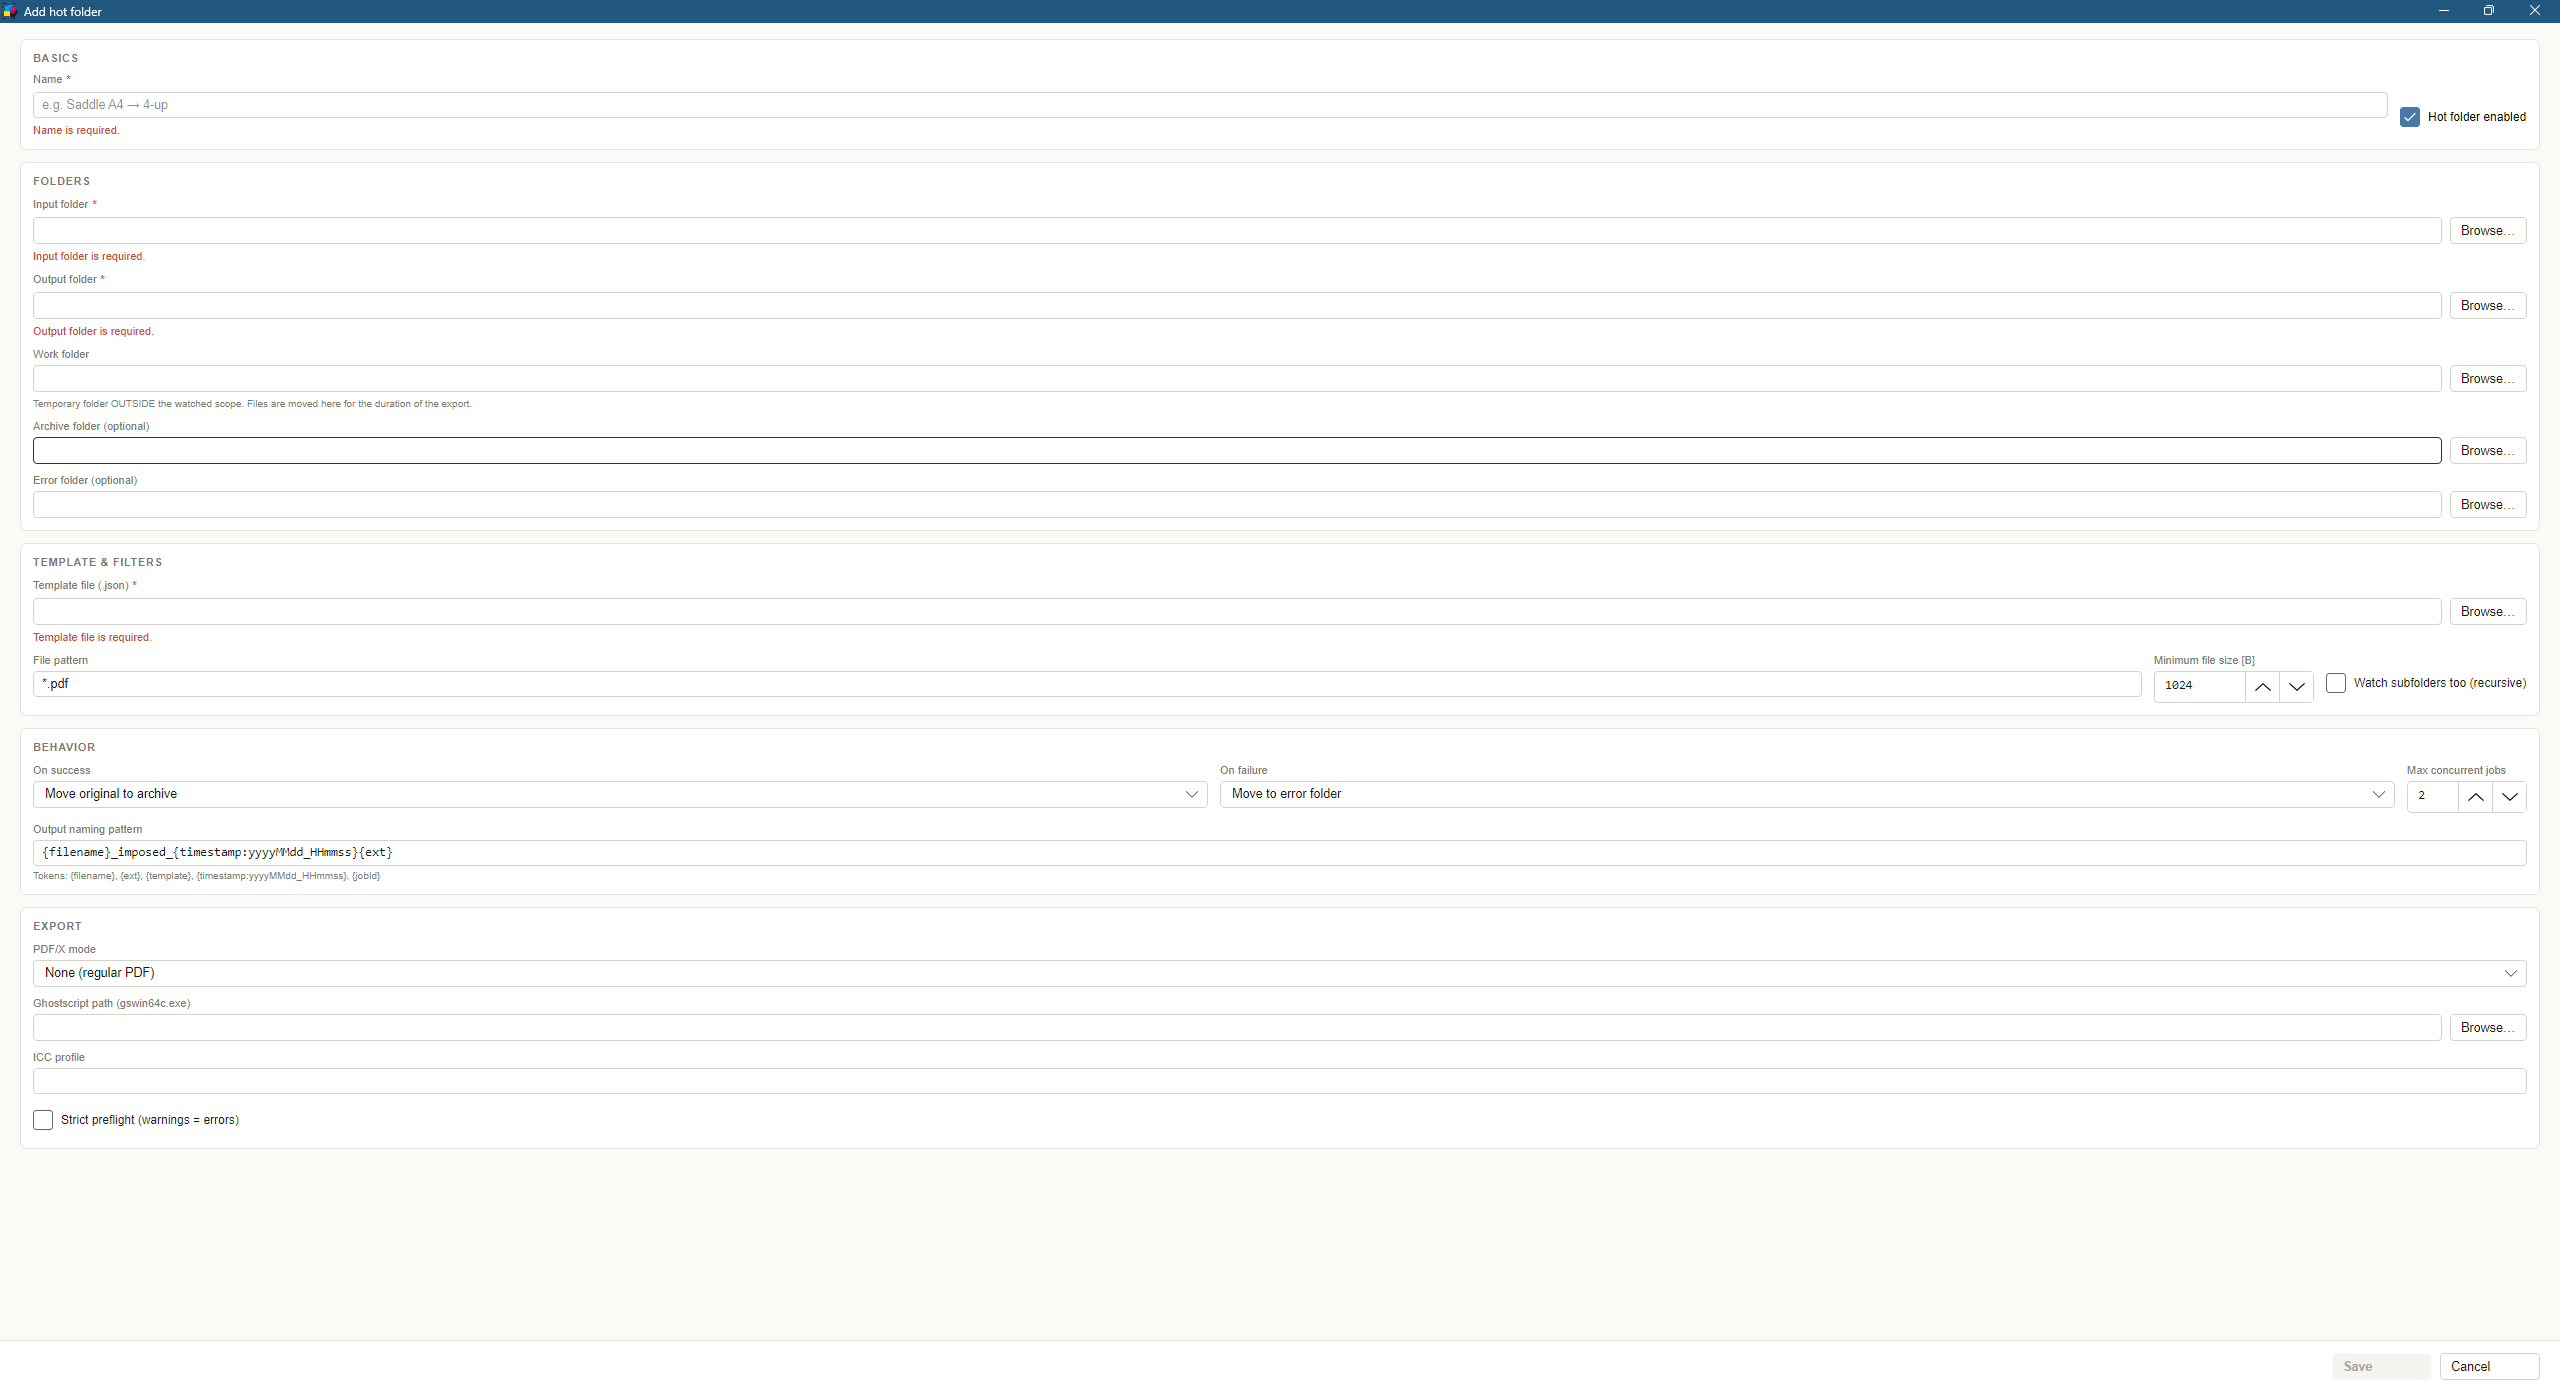
13.1. File flow
- A file appears in the input directory; the program waits until copying finishes (stability probe).
- The file is moved into the
.workstaging directory (it disappears from input — no double processing). - Imposition + export run with the folder's template; the result lands in the output directory under a pattern-based name.
- On success the original is deleted or archived (
.archive); on failure it moves to.errortogether with an.error.txtsidecar describing the cause.
A ledger of processed files (SQLite) guarantees the same file is never exported twice — even across restarts; interrupted jobs are returned to input at startup.
13.2. Folder configuration
| Field | Description |
|---|---|
| Input / output directory | The watched and the target paths (network shares allowed). |
| Template | Since 1.5.2 picked from the saved-templates list (the same library the template manager uses) or via "From file…" — the path field stays editable. |
| File pattern | E.g. *.pdf; optionally recursive — under "Advanced". |
| Output naming pattern | Tokens: {filename}, {ext}, {template}, {timestamp:format}, {jobid}, {guid}. Default: {filename}_imposed_{timestamp:yyyyMMdd_HHmmss}{ext}. Name collisions get a _2, _3… suffix (under "Advanced"). |
| On success / on failure | Delete / archive the original; leave in place / move to errors (under "Advanced"). |
| Export options | PDF/X (X-1a/X-3/X-4), PDF/X engine (Auto / imPRESS Export Engine / Ghostscript), plain-export PDF version (1.4–1.7), ICC profile, strict preflight and cutting guide — per folder. Sheet numbering comes from the template. The Ghostscript path is optional: when blank, the bundled copy is used. |
13.3. JDF / XJDF job tickets 1.6.0
If your MIS issues CIP4 tickets, a hot folder can read them instead of guessing from the PDF alone. Tick Accept JDF / XJDF job tickets in the folder's filter section.
A ticket is not the work — it describes the work and names the file that is. The program reads the finished size, press sheet, binding and sidedness from it, then imposes the PDF it points at.
- The MIS writes the PDF first and the ticket last — the ticket is the "go" signal. The other way round, the program waits for the artwork anyway.
- The folder's template stays. A ticket overrides only what it states; your bleed, gutters, margins and marks are untouched.
- Every override appears in the job log with the value before and after — a sheet that came out other than expected can be traced to the ticket that asked for it.
- Afterwards the ticket and its artwork travel together: both to the archive, or both to the error folder.
| Situation | What the program does |
|---|---|
| The ticket states a different page count than the PDF | Reports the disagreement but counts pages from the PDF. The file decides. |
| A binding the program does not impose (Ring, Tape, thread sewing) | Keeps the template's binding and logs what the ticket asked for. It never substitutes the "nearest" one — ring binding imposed as saddle stitch is a scrapped run. |
| Artwork named outside the allowed directories | Refuses the job and says why. The folder's input directory is always allowed; add others in the configuration. |
The ticket points at an http / ftp address | Refused. The program fetches local files only. |
595.276 is A4 width. The program converts them itself; nothing has to change on the MIS side.
13.4. Hot folders as a Windows service 1.6.0
A hot folder run from the program window stops when you log off. Installed as a service it keeps going — across reboots and with nobody logged in. This is the setting for a workstation that has to work overnight.
The easiest route is the hot folder manager: the Windows service row at the bottom shows the state and offers Install service, Start, Stop and Remove service. A User Account Control prompt appears — registering a service needs administrator rights, and the program does not otherwise need them.
hotfolder service install --account DOMAIN\user --password ***
- The service reads the same configuration and licence as the program — the path is captured at install time.
- After a failure Windows restarts it automatically: three attempts a minute apart.
- Check the state with
hotfolder service statusor in the Windows Services window, where it appears as imPRESS Studio Hot Folders. Scripts andsc/net startcommands use the keyImpressStudioHotFolders. - Updating the program stops the service while the files are copied and starts it again — the service holds the program files open, so without that the installer could not replace them. That is where the UAC prompt during an update comes from; it appears only on machines that actually run the service. Uninstalling the program removes the service. 1.6.3
- Before installing the service, test the folder from the program window — a configuration mistake is far easier to spot when a window is showing live status.
Sheet numbering is read from the assigned template. The old per-folder setting is retained only as a compatibility fallback when the template has none; its checkbox is no longer in the folder editor. Standalone hot folders do not create Workflow jobs in 1.7.0. See chapter 18 for the separate job server.
14. Command line (CLI)
The program also runs headless — the same engine as the GUI, no window:
"imPRESS Studio.exe" impose --source job.pdf --output result.pdf --template template.json
"imPRESS Studio.exe" impose --source job.pdf --output result.pdf --template template.json ^
                     --pdfx x3 --icc "PSOcoated_v3" --gs "C:\...\gswin64c.exe" ^
                     --sheet-range 1-3 --page-range 1-16 --numbering --cutting-guide
"imPRESS Studio.exe" license activate --key <KEY>
"imPRESS Studio.exe" license info
"imPRESS Studio.exe" hotfolder run      <- hot-folder daemon in the console (Ctrl+C stops)
"imPRESS Studio.exe" hotfolder list
impose options: --pdfx none|x1a|x3|x4, --engine auto|native|gs (PDF/X engine), --pdf-version 14|15|16|17 (plain exports), --icc (profile name or absolute path), --sheet-range, --page-range, --numbering (legacy force-enable when the template has no numbering of its own), --strict-preflight, --cutting-guide; the legacy --pdfx4 switch still works.
| Command | Description |
|---|---|
impose | Full imposition: analyse → preflight → plan → compose (+ optional PDF/X-4 and cutting guide). |
license | Activation and license information (including the machine fingerprint used to issue a license). |
hotfolder | run / list / start <id> / stop <id> / reload. |
15. Worked examples — tutorials
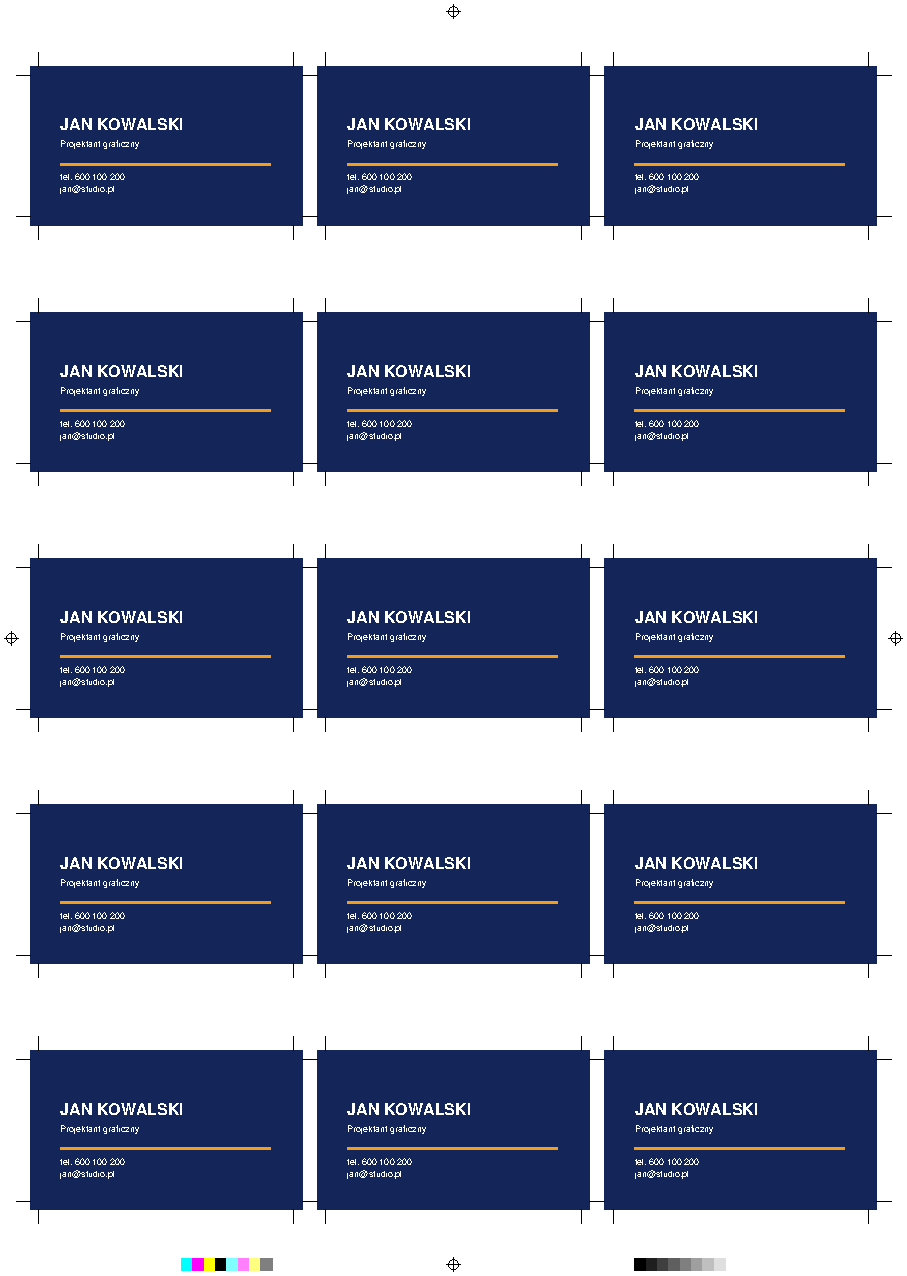
All illustrations in this chapter are genuine program output (rendered pages of exported PDFs).
15.1. Double-sided business cards 90×50 mm, 15-up on SRA3
Material: a 2-page PDF (page 1 = front, page 2 = back), 90×50 mm trim with 3 mm bleed (TrimBox present in the file).
- Template: Ganging, SRA3 sheet 320×450 (portrait), trim 90×50, bleed 3, gutter 4, sheet margin 10, N-up 3×5, duplex on.
- Marks: crop marks + registration + control bars (the "Default" profile).
- Add the card file → "Plan imposition" → check the bleed guides → "Export…" with the cutting guide enabled.
Result: 1 sheet, 2 PDF pages (front + back — fronts on the recto, backs on the verso) + the cutting-guide page. 15 cards per pass.
15.2. A5 booklet, 8 pages, saddle stitch with creep
Material: an 8-page A5 PDF (148×210 mm).
- Template: saddle stitch, SRA3 sheet 450×320 (landscape), trim 148×210, 8 pages per signature, margin 10.
- Enable creep and enter a paper thickness of 0.1 mm.
- Marks: crop, registration and fold marks.
- Plan → export. Result: 2 sheets (4 PDF pages).
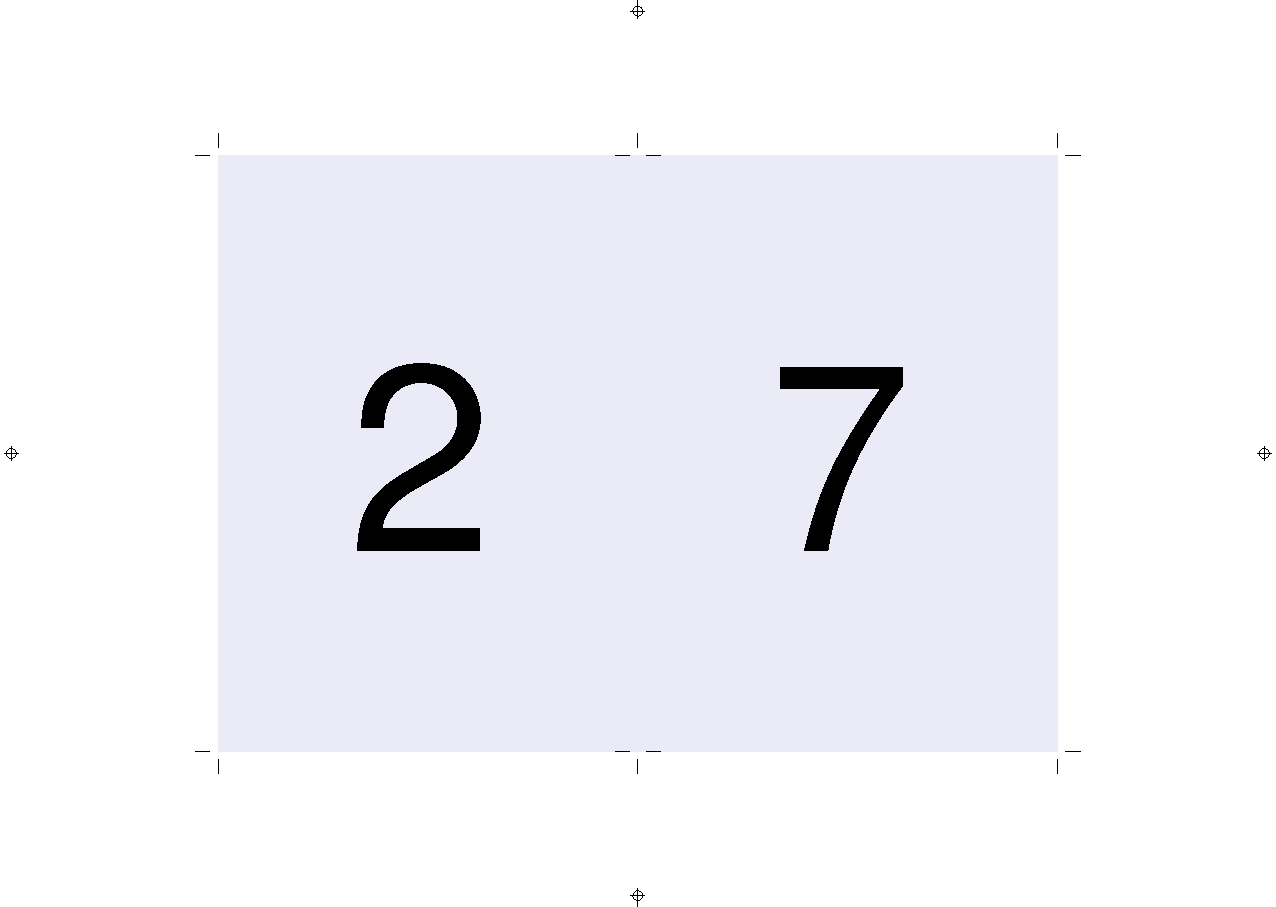
Page layout: sheet 1 front [8·1], back [2·7]; sheet 2 front [6·3], back [4·5]. After duplex printing, folding and stapling the pages read 1→8.
15.3. 100×50 mm labels on a 320 mm roll with auto-rotation
Material: a 1-page PDF with a 100×50 mm label design.
- Template: Roll-fed, "Roll 320" sheet (320 mm web width), trim 100×50, margin 5.
- Roll section: repeat count (e.g. 100), 2×2 mm gaps, "Allow rotation" enabled — the program works out that rotating 90° fits 6 instead of 3 labels per row.
- For a cutting plotter, enable Summa OPOS markers in the marks profile.
- Plan → export. Web segment length is computed automatically; a length limit splits the run into consecutive segments (PDF pages).

15.4. DL leaflet folded in a "Z" (6 pages)
Material: a 6-page PDF with 99×210 mm panels.
- Template: Z-fold, A4 landscape sheet (297×210), trim 99×210, 3 panels, zero margins (panels meet at the fold lines), duplex on.
- Plan → export. Result: 1 sheet, 2 PDF pages.
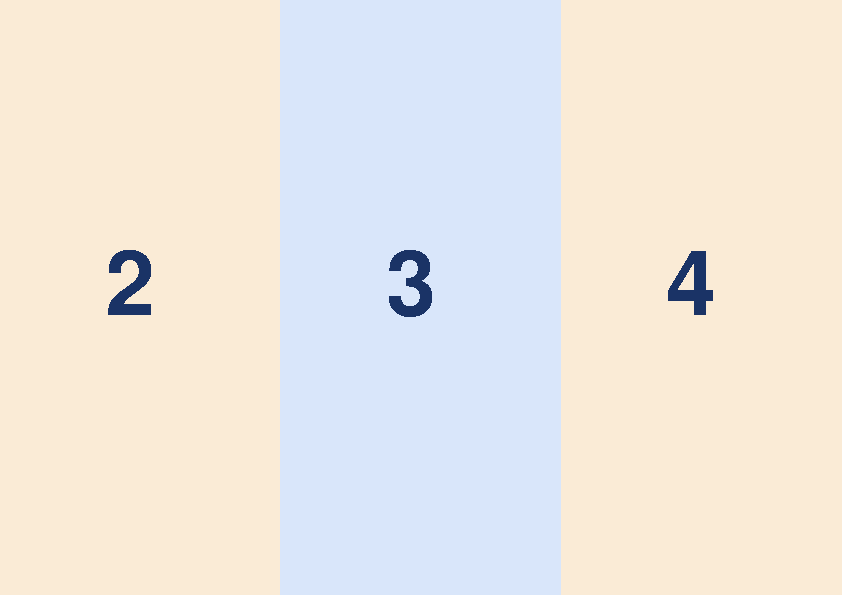
The program arranges the panels itself: front [2·3·4], back [5·6·1] — folded into a "Z", page 1 becomes the cover and the reader opens panels in order 1→6.
15.5. Automation: a hot folder for business cards
- Save the template from example 15.1 to a file (e.g.
C:\Shop\templates\cards_15up.json). - In the hot folder manager add a folder: input
C:\Shop\IN\cards, outputC:\Shop\OUT\cards, point it at the template. - Naming pattern:
{filename}_15up_{timestamp:yyyyMMdd_HHmm}{ext}; on success: archive the original. - Enable the folder. From now on every PDF dropped into the input directory comes out moments later as a production-ready sheet — without opening the application.
16. Troubleshooting
| Symptom / message | Cause and fix |
|---|---|
| "Required sheet width … exceeds available …" | Items plus gaps and margins do not fit the sheet. Reduce the N-up, gaps or margins, pick a larger sheet, or run the layout optimizer. |
| "Preflight failed with errors" | The report contains an error (e.g. page-count mismatch). Open the preflight report — the code pinpoints the cause (chapter 10). |
| Export blocked — license | The license expired or the license file was removed. Check "license info" / re-activate (section 2.3). |
| "Ghostscript … not found" during PDF/X | Point the export options at gswin64c.exe (Ghostscript ships with the program). |
| "ICC profile … not found" | The selected profile does not exist in the profile folders — drop the .icc file into %APPDATA%\imPRESS Studio\icc. |
| White strips after trimming the print | The artwork does not reach into the bleed (preflight: BLEED_CONTENT_UNUSED). Fix the source file — the program does not invent bleed. |
| Hot folder does not process files | Check the folder status in the manager (error column), whether the file matches the pattern, and whether it was already processed (dedup ledger — change the file content or name to force a re-run). |
| Slow preview on very large sheets | The preview caps raster resolution to bound memory — this never affects export (output is vector). For roll work, zoom into fragments. |
16.1. Reporting a problem 1.6.2
Help → Report a problem packs everything support needs into one ZIP archive: the application logs, the settings file, the hot folder configuration, saved templates and marks profiles, and a summary of the environment — version, operating system, licence edition and state, machine id and directory locations. Nothing has to be found by hand.
Describe in the dialog what you were doing and what you expected instead. The logs say what the program did, not what was supposed to happen — your description goes into the archive as diagnostics.txt.
The package is saved to your desktop and copied to the clipboard, and the mail opens with the address filled in: attaching it comes down to Ctrl+V. Nothing is sent on its own — you can open the archive and read it first.
The licence file is never included; the summary names only the edition and the machine id. Do bear in mind that the logs contain the names and paths of the files you processed.
Should you need the logs separately: %LOCALAPPDATA%\imPRESS Studio\logs.
17. Glossary
- Imposition
- Arranging a publication's pages on a press sheet in the correct order and orientation.
- Item (trim)
- A single finished product on the sheet after cutting (e.g. one business card).
- Bleed
- Artwork allowance past the cut line (typically 3 mm / 0.125″), compensating cutter tolerance.
- Safe zone
- The area inside the cut line that should contain all text and logos.
- N-up
- The number of items placed on one sheet (15-up = 15 copies).
- Signature / section
- A group of pages printed on one sheet and folded together.
- Creep
- Outward push of a section's inner leaves; compensated by shifting content toward the spine.
- Duplex
- Double-sided printing; the sheet's back registers with its front after the sheet is turned.
- Registration mark
- A colour-registration target printed on every separation.
- Slug
- A technical job description printed in the sheet margin.
- OPOS
- Summa's optical positioning system for cutting plotters; solid black squares read by a sensor.
- PDF/X
- The ISO family of standards for print-exchange PDF files (X-1a, X-4).
- TrimBox / MediaBox
- PDF page boxes: the net format after trimming / the full page format including allowance.
- Hot folder
- A watched directory that automatically processes every file dropped into it.
18. Impress Workflow — from submission to production
In 1.7.0, imPRESS Studio accepts jobs through a web portal and REST API, runs preflight, prepares imposition, exports output and delivers it to a folder or printer. The server is built into the application and is disabled by default.
18.1. Starting the server for the first time
- Open Settings → Workflow Server…. On the Server tab, set the listening address, port and job folder. Review the upload limit, worker count and stage timeout.
- On the Users tab, create accounts with appropriate roles. Generated passwords and API keys are shown only once; save them and hand them to the intended user.
- On the Pipeline tab, prepare a workflow: template, preflight profile, approval and export settings. Choose Manual mode for the first trial.
- Enable the server. The start-with-imPRESS option starts it on subsequent application launches. Its status is also shown in the Workflow panel.
- Open the configured address in a browser, for example
http://server-address:port/, and sign in. From another computer, use the server computer's address, notlocalhost.
The default access mode is intended for a local network. Sign-in can only be disabled on a 127.0.0.1 listener. An administrator configures access outside the LAN and HTTPS in the application. Closing the application stops its server; use the Windows service for continuous operation.
18.2. Roles and access
| Role | Typical work |
|---|---|
| SubmitUser | A customer or submitter creates jobs, uploads files and sees only their own jobs. |
| DTP | Prepares files, creates and edits jobs, runs preflight, holds and releases work. Cannot approve production. |
| Operator | Reviews the queue, runs preflight, approves and starts production, holds or rejects jobs. |
| ProductionManager | Manages production, workflows, rules and papers; cannot manage accounts or server configuration. |
| Administrator | Full access, including accounts, server configuration, output targets and printers. |
Available buttons depend on both permissions and the job's current state. A missing action does not necessarily indicate a fault. The last active Administrator cannot be disabled or demoted.
18.3. Your first job, step by step
- Create a new job in the portal. Enter its name, quantity, paper settings, single- or double-sided printing, and a due date and notes where needed.
- Choose a saved shop template, a built-in preset or leave the choice to the shop. The catalogue includes templates from the desktop template manager. A rule can select a preset instead of the job's choice; with no choice, the workflow template applies.
- Upload a PDF and wait for confirmation. Preflight starts automatically if the workflow enables it. Otherwise the job returns to New and the operator must start the check.
- Review the report, dimensions, page count, bleed, paper and grammage. Use Auto-repair for applicable fixes or request a replacement file.
- Approve the job if required, then select Produce. In Automatic mode, matching jobs can start without a manual production command.
- Follow progress and check the finished PDF. Download it or choose Send / print. Complete the job when the work is finished.
The shared paper catalogue is available in Settings → Workflow Server → Papers and in the portal. A stock can have one or several grammages. For saddle-stitched jobs with creep compensation, the job's paper kind and grammage determine the caliper used in calculations.
18.4. Statuses and operator decisions
| Status | Meaning and next step |
|---|---|
| New / Uploading | A new job or an upload in progress. Wait for the upload to finish. |
| Preflight | The file is being analysed. Review the report and checklist. |
| Waiting | The job awaits an operator decision, workflow selection or approval. |
| Processing | Background production: imposition, export and optional delivery. |
| Ready | Output is ready to download or deliver. |
| Completed | The job is finished. Create a separate job for a new production order. |
| Hold / Error / Rejected | Held, failed or rejected work. Check the reason and history before acting. |
New artwork or another preflight clears previous approval. Approve again after checking the current result. A failed job shows its stage and reason; Retry resumes from the failed stage. The stage timeout defaults to 30 minutes and is configurable.
18.5. Panel, production board and teamwork
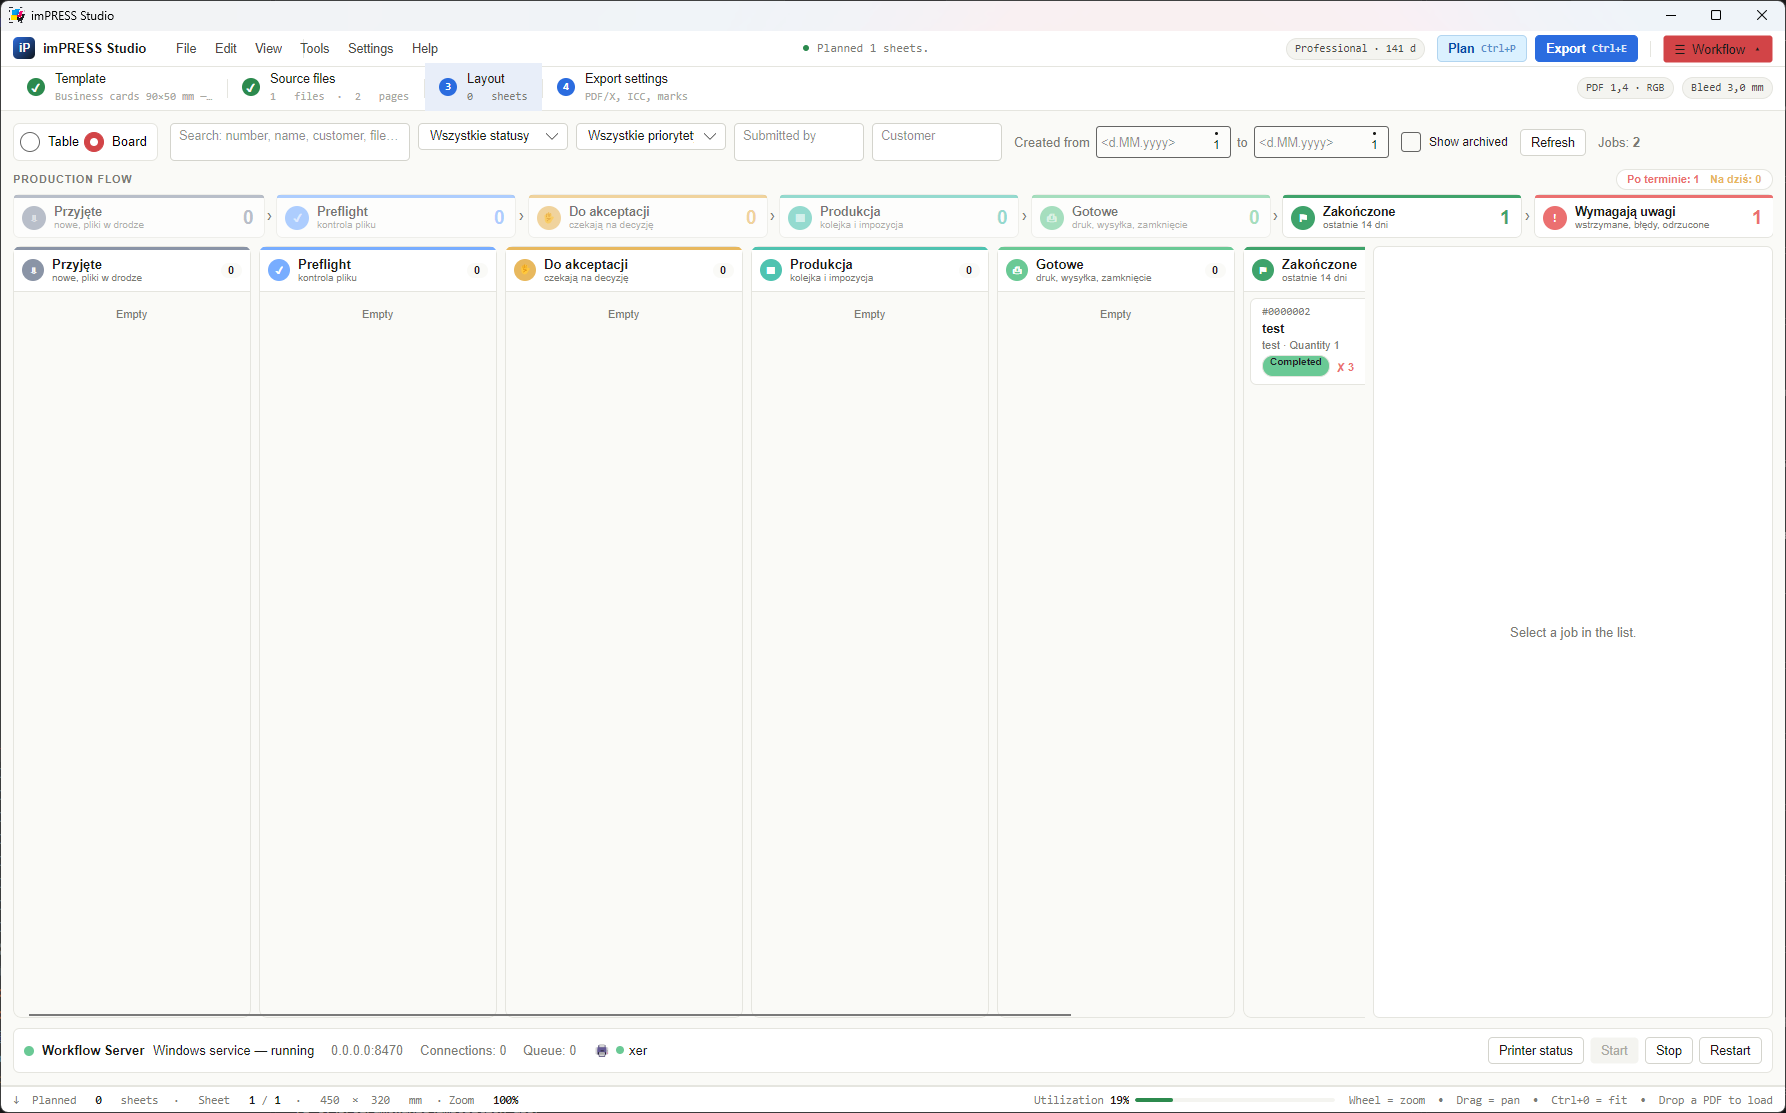
Open the panel with Workflow at the right end of the toolbar or Ctrl+Shift+W. Press again to close it. The Table | Board switch changes the queue presentation. Filter by status, priority, user, customer, date and archive. The stage strip and overdue/due-today filters help prioritise work.
The portal provides a staff Production board (#/board). Columns follow received jobs through preflight, approval and production to ready and completed work. A separate group contains jobs needing attention. Change statuses with action buttons; dragging cards is not the status-transition mechanism in this version.
In the portal, select multiple jobs and run an available bulk action. Each job is checked individually; read the result because some jobs may not meet the action's conditions. Priority and due date influence card order. Priority changes are recorded in the history.
Open in imPRESS loads a working copy into the editor and collapses the panel. Saving or exporting registers the result with the job. Distinguish the uploaded original's preflight report from later manual edits: an earlier report does not certify a later export. Archiving in the panel is not a new status and does not disable retention.
18.6. Workflows, rules and dry runs
On the Pipeline tab, choose a workflow and configure its ten steps: Input → Preflight → Condition → Repair → Approval → Imposition → Export → Output → Notification → Completion. Click a card to open its settings; the workflow mode is on the Approval card.
- Manual: the operator decides what happens after preflight.
- Assisted: the application suggests a rule, then waits for approval.
- Automatic: a matching rule leads to production; jobs without a match wait for the operator.
Rules can consider page dimensions and count, quantity, paper, grammage, duplex, customer, priority and preflight results. They configure templates and the existing production engine. Check rule priority and whether each rule is enabled. The editor flags missing templates, automatic processing without rules, disabled output targets and notifications without an address.
Dry run checks a selected PDF against the current workflow, including unsaved edits. It shows preflight results, matching rules, repairs, the approval route, template, export and output availability. It creates no job, writes no output and sends nothing.
Auto-repair lists applicable changes and problems it cannot fix, such as missing bleed. Select the required actions; they operate on a working copy with another check. Production uses the newest working copy. Webhook notifications and automatic completion after delivery are optional; enable them explicitly in the workflow.
18.7. Output targets and printers
- An administrator opens Settings → Workflow Server → Output targets or the portal's administration area.
- Add a folder, IPP/IPPS printer, port 9100 device or installed Windows queue. Enter a name and the settings needed for that type.
- For a printer, set copies (1–999), duplex and data format. Select raster resolution and greyscale where needed.
- Run Test. A folder test checks writing; a printer test reads its state and capabilities.
- Assign the target to a workflow/rule, or let the operator choose it under Send / print for finished work. Confirm the device and copy count before sending.
| Connection | Format and key settings |
|---|---|
| IPP/IPPS or port 9100 | Automatic mode detects PDF support and uses PostScript Level 3 where appropriate. You can force a format. A device supporting neither PDF nor PostScript is refused. |
| Windows queue | Data is spooled as RAW without driver rendering. Automatic means PDF here; choose PostScript for a device without PDF support. |
| PostScript | PDFium rasterises pages at 300 dpi by default. Match resolution and greyscale to the device. |
| Automatic duplex | Uses the job settings and imposed fronts/backs: long edge for portrait sheets, short edge for landscape sheets. Check a sample before the full run. |
An output folder can feed a RIP or another hot folder. Files are written under temporary names and renamed when complete without overwriting existing results. Manual sending selects the newest finished PDF (PDF/X if produced), records delivery in the history and does not change job status. A target used by a workflow or rule cannot be deleted.
18.8. Running without a signed-in operator — Windows service
Under Server → Windows service, an administrator can install, start, stop, restart or remove imPRESS Studio Workflow. These operations require UAC confirmation. The service keeps the portal and processing running after sign-out and computer restart.
The application and service share data, templates and job folders. While the service is installed, the application does not start another server on the same port; the panel controls the service. Its account must have access to the production folders and printer queues. Removing the service restores the application's ability to host the server itself.
18.9. Administration, retention and integrations
Portal administration exposes accounts, outputs and printers, papers, workflows, rules and server settings according to role. Settings requiring restart are marked. Resetting a password ends existing sessions; API keys can be issued and revoked.
Retention is disabled by default. Once a day count is configured, completed and rejected jobs can be deleted automatically; include this in your file-storage policy. Each job has separate original, working, output, report and thumbnail directories.
Integrations use the REST API under /api and account API keys. Diagnostic commands, run from the application directory:
"imPRESS Studio.exe" workflow status
"imPRESS Studio.exe" workflow output list
"imPRESS Studio.exe" workflow service status
"imPRESS Studio.exe" workflow --help
Version 1.7.0 boundary: existing hot folders still process jobs independently. Feeding their files into Workflow jobs and integrating JDF/JMF with Workflow are planned. JDF/XJDF tickets described in the standalone hot-folder chapter do not imply this integration.
18.10. Common problems
| Symptom | What to check |
|---|---|
| Portal does not respond | Server/service state, address and port, LAN connection and firewall rules. On a client workstation, localhost means that client computer. |
| No approval action | Account role and job state. DTP cannot approve production. |
| Production waits after previous approval | A replacement upload or another preflight may have cleared approval. |
| Automatic processing does not start | Matching and enabled rules, preflight results, approval settings and workflow validator messages. |
| Error or timeout | Read the failed stage, reason and time. Resolve the cause, such as folder access, then Retry. |
| Printer rejects output | Test the target and check format and connection type. Automatic Windows queues send PDF without driver conversion. |
| Service cannot see a folder or printer | Check access and configuration for the service account, not just the signed-in operator. |
19. Updating an existing installation to 1.7.0
- Install the update and check your saved templates and a representative job.
- Review sheet numbering in Templates → Extras. On first start, the old export setting migrates to saved templates without their own numbering. Positional sheet formats are converted to named tokens; numeric formatting such as
{0:000}becomes plain{sheet}. Check the result. - Preview the logo, numbering and OPOS marks, then export a sample and a sheet-range reprint. Confirm numbering against the full run.
- Enable Workflow only when you want to use the job server. Until then, templates, hot folders, CLI and ordinary export keep working. First enablement creates the Workflow database and job folders.
- Prepare roles, a manual workflow and a test job before enabling automatic production or output to a printer.
Instructions cover released operator features through 1.7.0, including 1.6.4 and 1.6.5 changes. Workflow hot-folder ingestion and JDF/JMF integration are not included as available features.